How to Carry Water When Running - A Guide for Every Distance

Figuring out how to carry water on a run is pretty straightforward once you break it down. It really comes down to choosing the gear that fits your run and feels right for you—usually a handheld bottle, a hydration belt, or a vest. Getting this right transforms hydration from a nagging chore into one of your best performance tools.
Why Smart Hydration Is Your Secret Weapon
We all know water is essential. That's a given. The real conversation is about how smart hydration—having water when you need it, without fuss—can totally change your running game. Dehydration isn't just about feeling thirsty. It physically slows you down, makes every step feel harder, and messes with your recovery.
Losing just 2% of your body weight in fluid is enough to tank your pace and stamina. Seriously.
That's why thinking about your water strategy is as crucial as your training plan. Don't see it as a burden. Instead, think of it as the key to unlocking that next PR. The main ways to carry water each have their place, so it's all about matching the gear to your specific goal for the day.
Matching Gear To Your Running Goals
A lot of runners worry that carrying water will slow them down. It’s a valid concern, but for most of us, it’s not something to stress about. A 2020 study in the Journal of Human Kinetics actually found no meaningful difference in running economy when athletes carried up to 1.0 kg (that's about 2.2 lbs) in handhelds, belts, or vests for an hour.
That’s great news if you’re training for a half-marathon or longer. It confirms that a good, well-fitted hydration system isn't going to sabotage your performance.
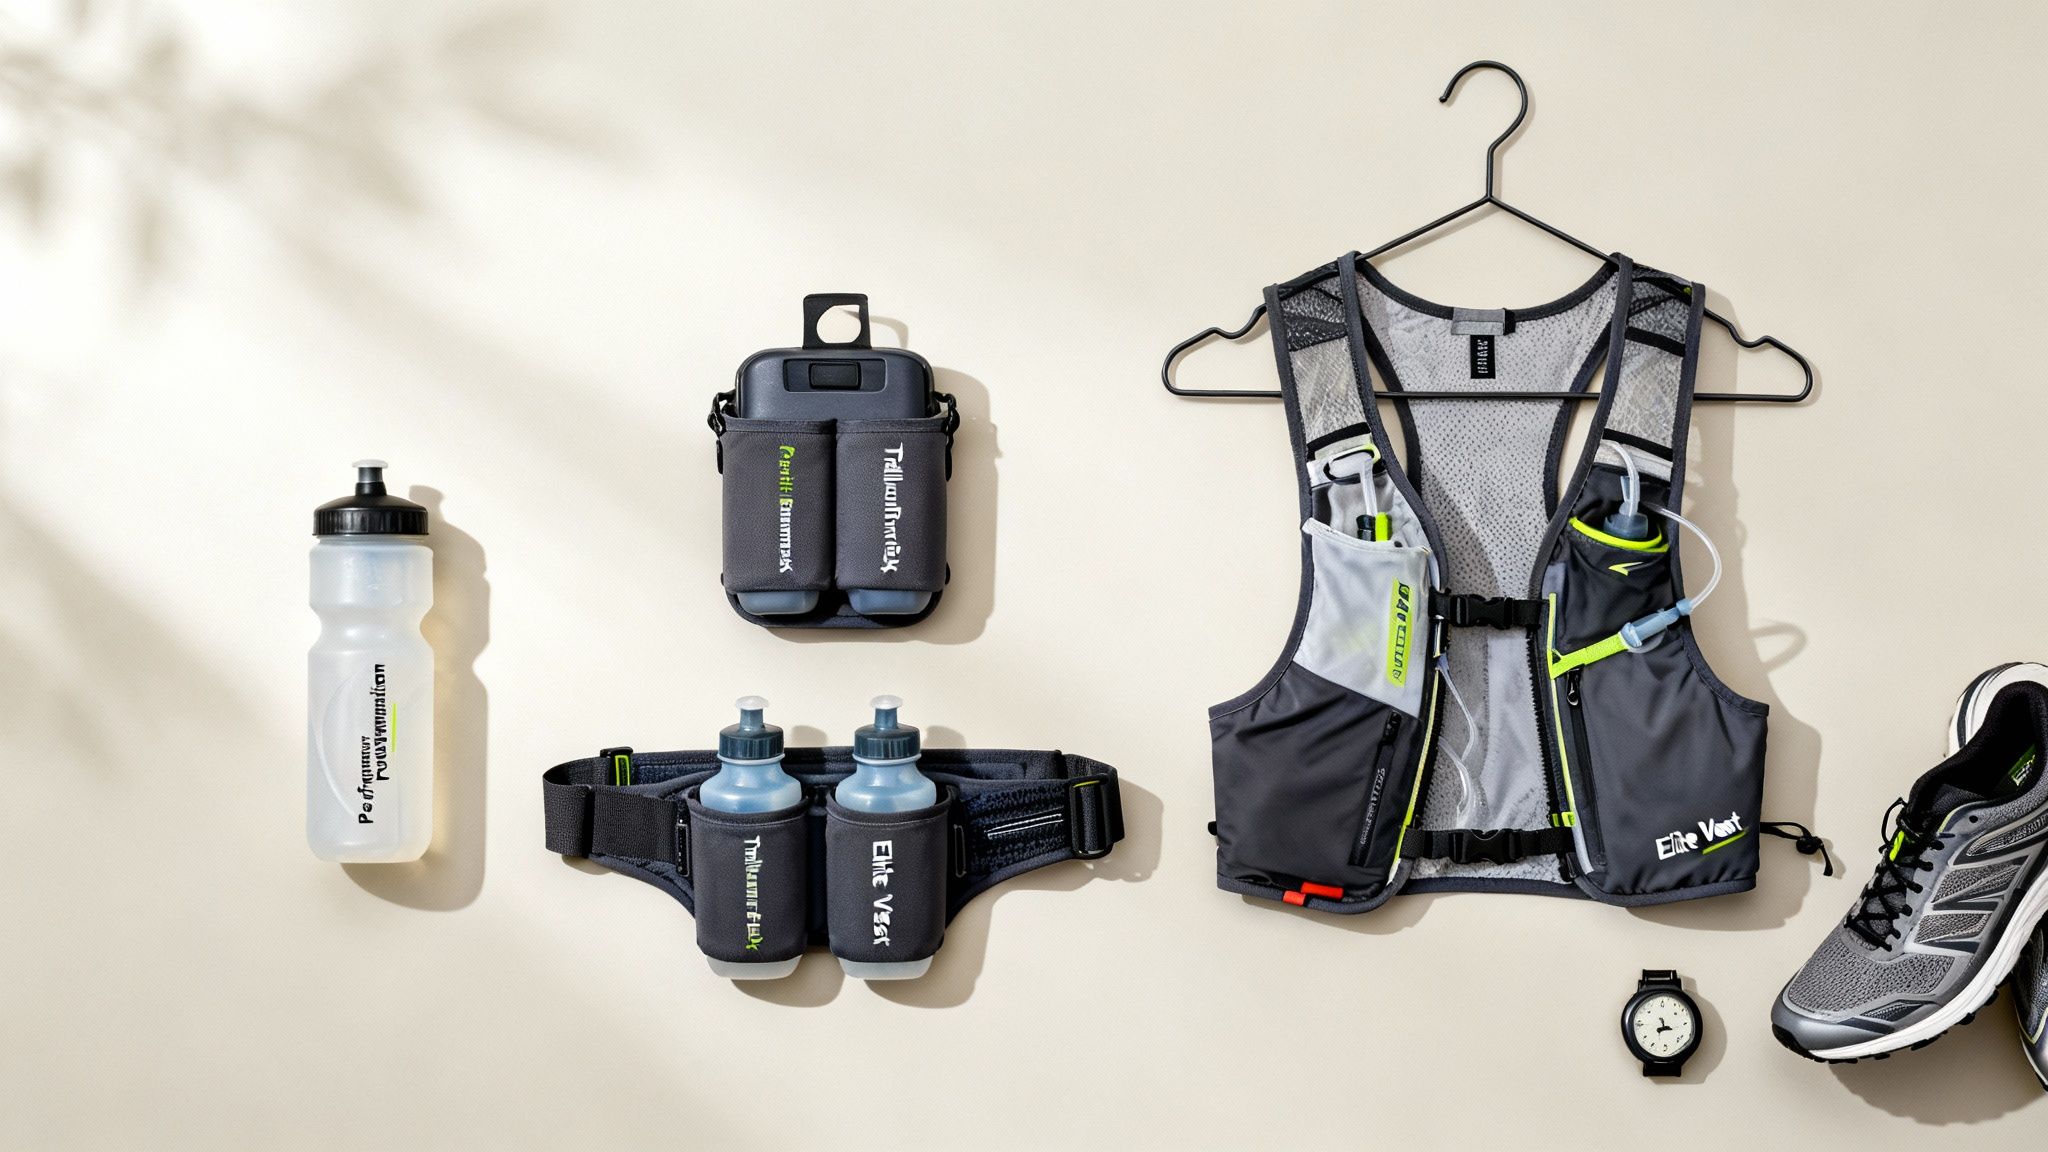
To make things simple, here's a quick breakdown of your options:
- Handheld Bottles: Perfect for shorter runs, say 30-75 minutes. They’re great when you just need a few sips and want instant access without breaking stride.
- Hydration Belts & Waist Packs: This is your sweet spot for those medium-to-long runs (60-120 minutes). They hold more fluid, often have pockets for gels or keys, and keep your hands totally free.
- Hydration Vests: The workhorse for marathons, ultras, and long trail adventures (2+ hours). These offer the most capacity for water, fuel, and extra gear like a jacket or headlamp.
The goal is to find a system that makes hydration a sustainable habit. The best gear is the kind you forget you're even wearing, letting you just focus on the run itself.
At the end of the day, getting your hydration dialed in is a huge part of improving your running endurance. This guide will walk you through the pros and cons of each option so you can find the perfect method to stay hydrated, run stronger, and crush your next goal.
The Simplicity of Handheld Running Bottles
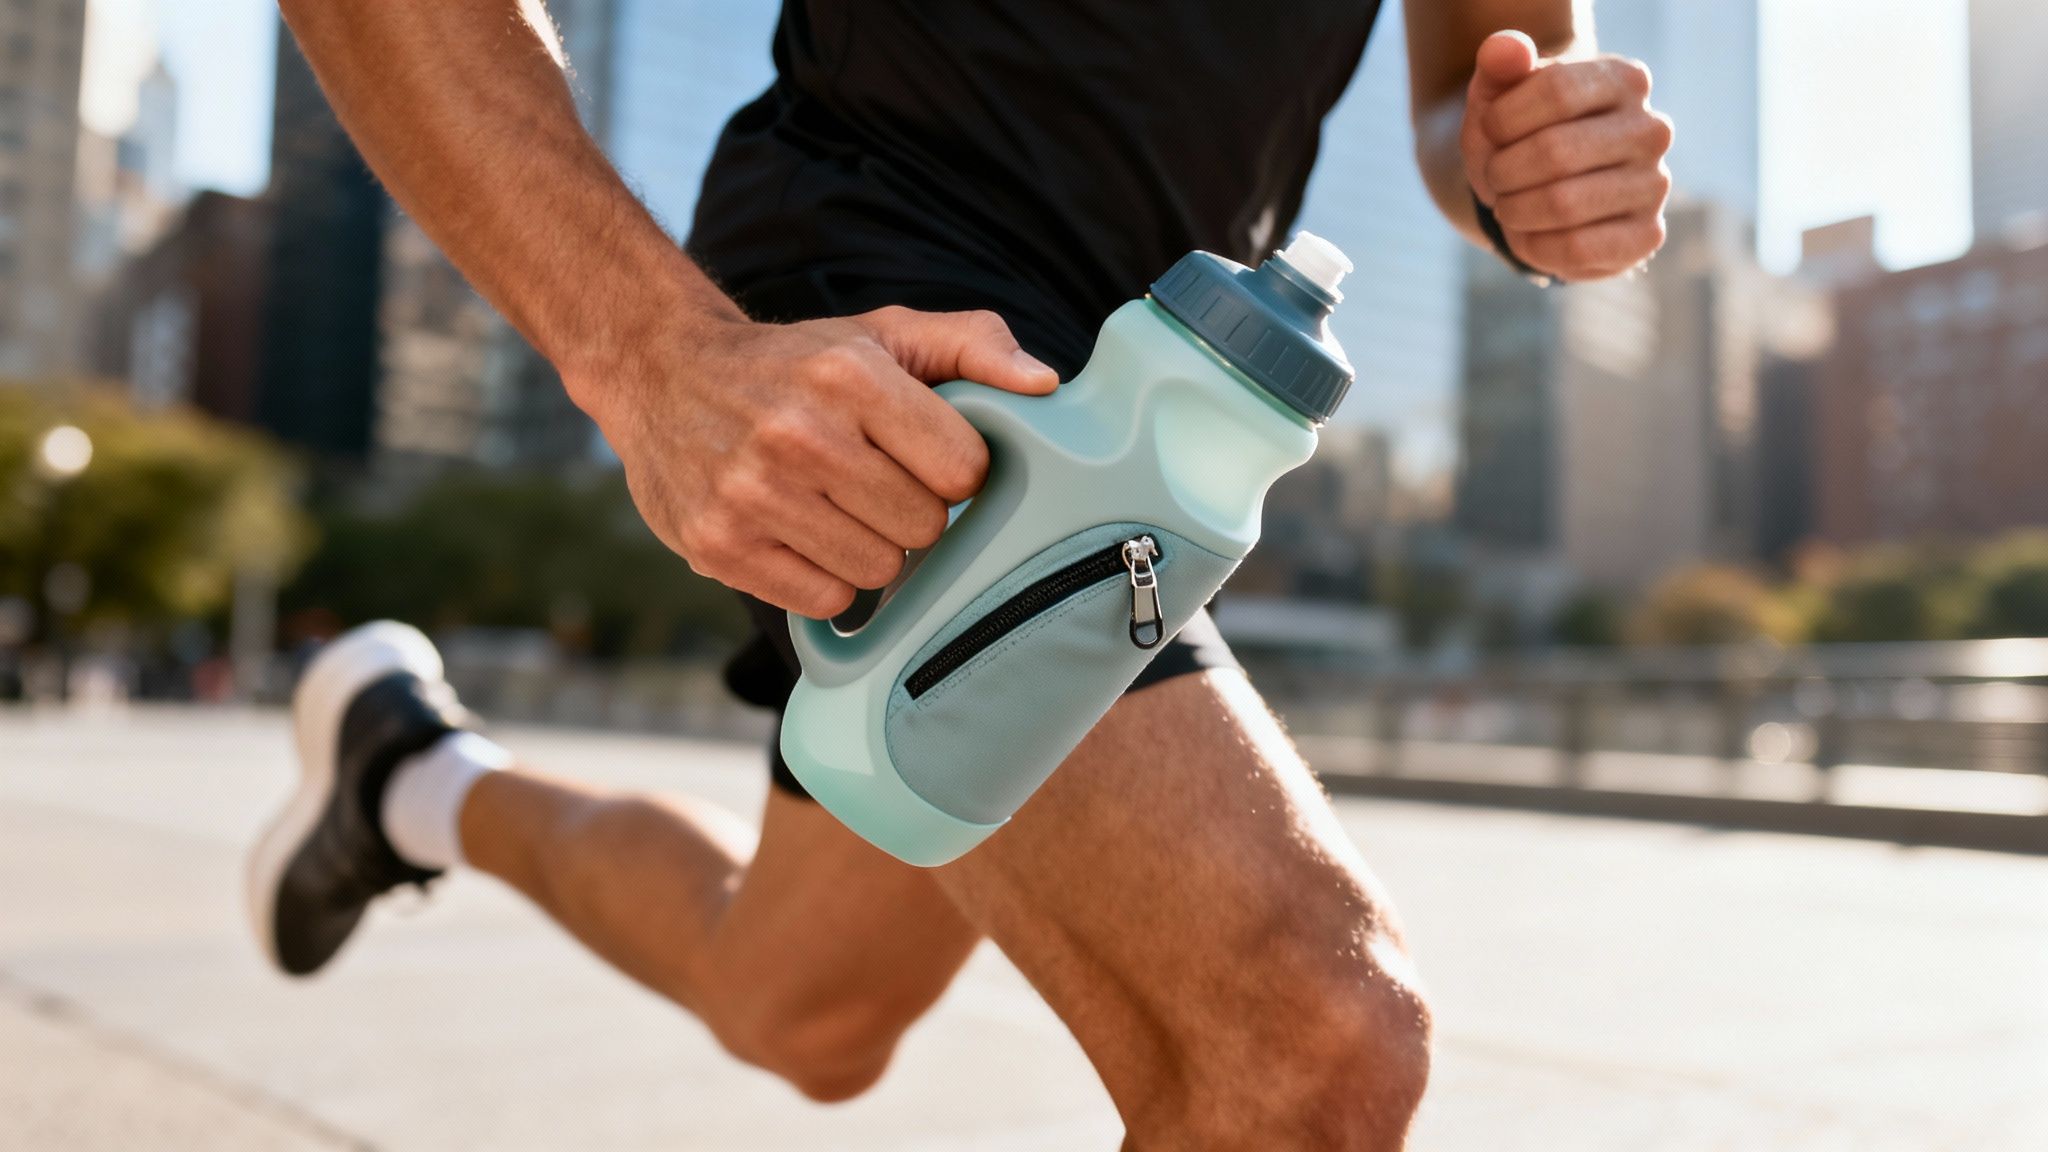
Sometimes, the simplest solution is the best one. For carrying water on a run, it doesn't get more straightforward than a handheld bottle. It's the original hydration method for a reason: you just grab it and go.
This no-fuss approach is perfect for shorter runs, like a city 10K or any training session under 90 minutes. You get instant access to your water without fumbling with packs or belts, making it easy to sip on the move without breaking your stride.
Modern handhelds are a far cry from a simple plastic bottle. They've been engineered specifically for runners, with features designed to make carrying them as comfortable as possible.
Designs for Every Runner
You've got options, and they all cater to different preferences.
- Ergonomic Hard Bottles: These are the classic choice, shaped to fit right into your palm. They almost always come with an adjustable hand strap, which is a game-changer because it lets you completely relax your grip. Many also feature a small zippered pocket—just enough space for a key, a credit card, or a gel.
- Collapsible Soft Flasks: If you hate carrying gear, this is your bottle. These are incredibly lightweight and shrink as you drink, which totally eliminates that annoying water sloshing sound. The best part? Once it's empty, you can roll it up and stuff it into a pocket or the back of your waistband.
Of course, nothing's perfect. The main complaint you'll hear about handhelds is the potential for tired hands and an unbalanced arm swing. Holding even a small amount of weight in one hand for a long time can subtly mess with your running form, causing one side of your body to work a little harder.
Pro Tip: Don't let one arm do all the work. The secret to using a handheld without messing up your form is simple: switch hands regularly. I make it a habit to swap the bottle to my other hand every mile or so. It makes a huge difference.
The Science and Strategy Behind Handhelds
You might think carrying anything in your hand would slow you down, but the science says it's not a big deal for typical bottle sizes. While handhelds have been around since the running boom of the 1970s, modern studies show that carrying a light load—around 0.3-1% of your body mass—doesn't have a meaningful impact on your running economy.
Even elite ultrarunners use this strategy. Patrick Caron, a 100-mile record holder, relies on the hand-switching technique to keep his form balanced and prevent the very asymmetry that coaches warn about. You can read more about the performance effects of running with a water bottle on marathonhandbook.com.
This simple trick keeps your arm swing even and gives each hand a break, preventing cramps and fatigue on those longer runs where a handheld is your hydration tool of choice. It’s a tiny adjustment that pays off big in comfort and efficiency over the miles.
Finding Balance with Hydration Belts and Waist Packs
When a handheld bottle isn't quite enough but a full-blown vest feels like overkill, hydration belts and waist packs hit that sweet spot. They’re a fantastic hands-free solution that lets you carry more water and fuel, making them a go-to for runs pushing that one-to-two-hour mark.
This is the bread and butter for most marathon and half-marathon training. A good waist pack gives you enough fluid to stay properly hydrated, plus it has room for gels, keys, and your phone, all without weighing down your upper body.
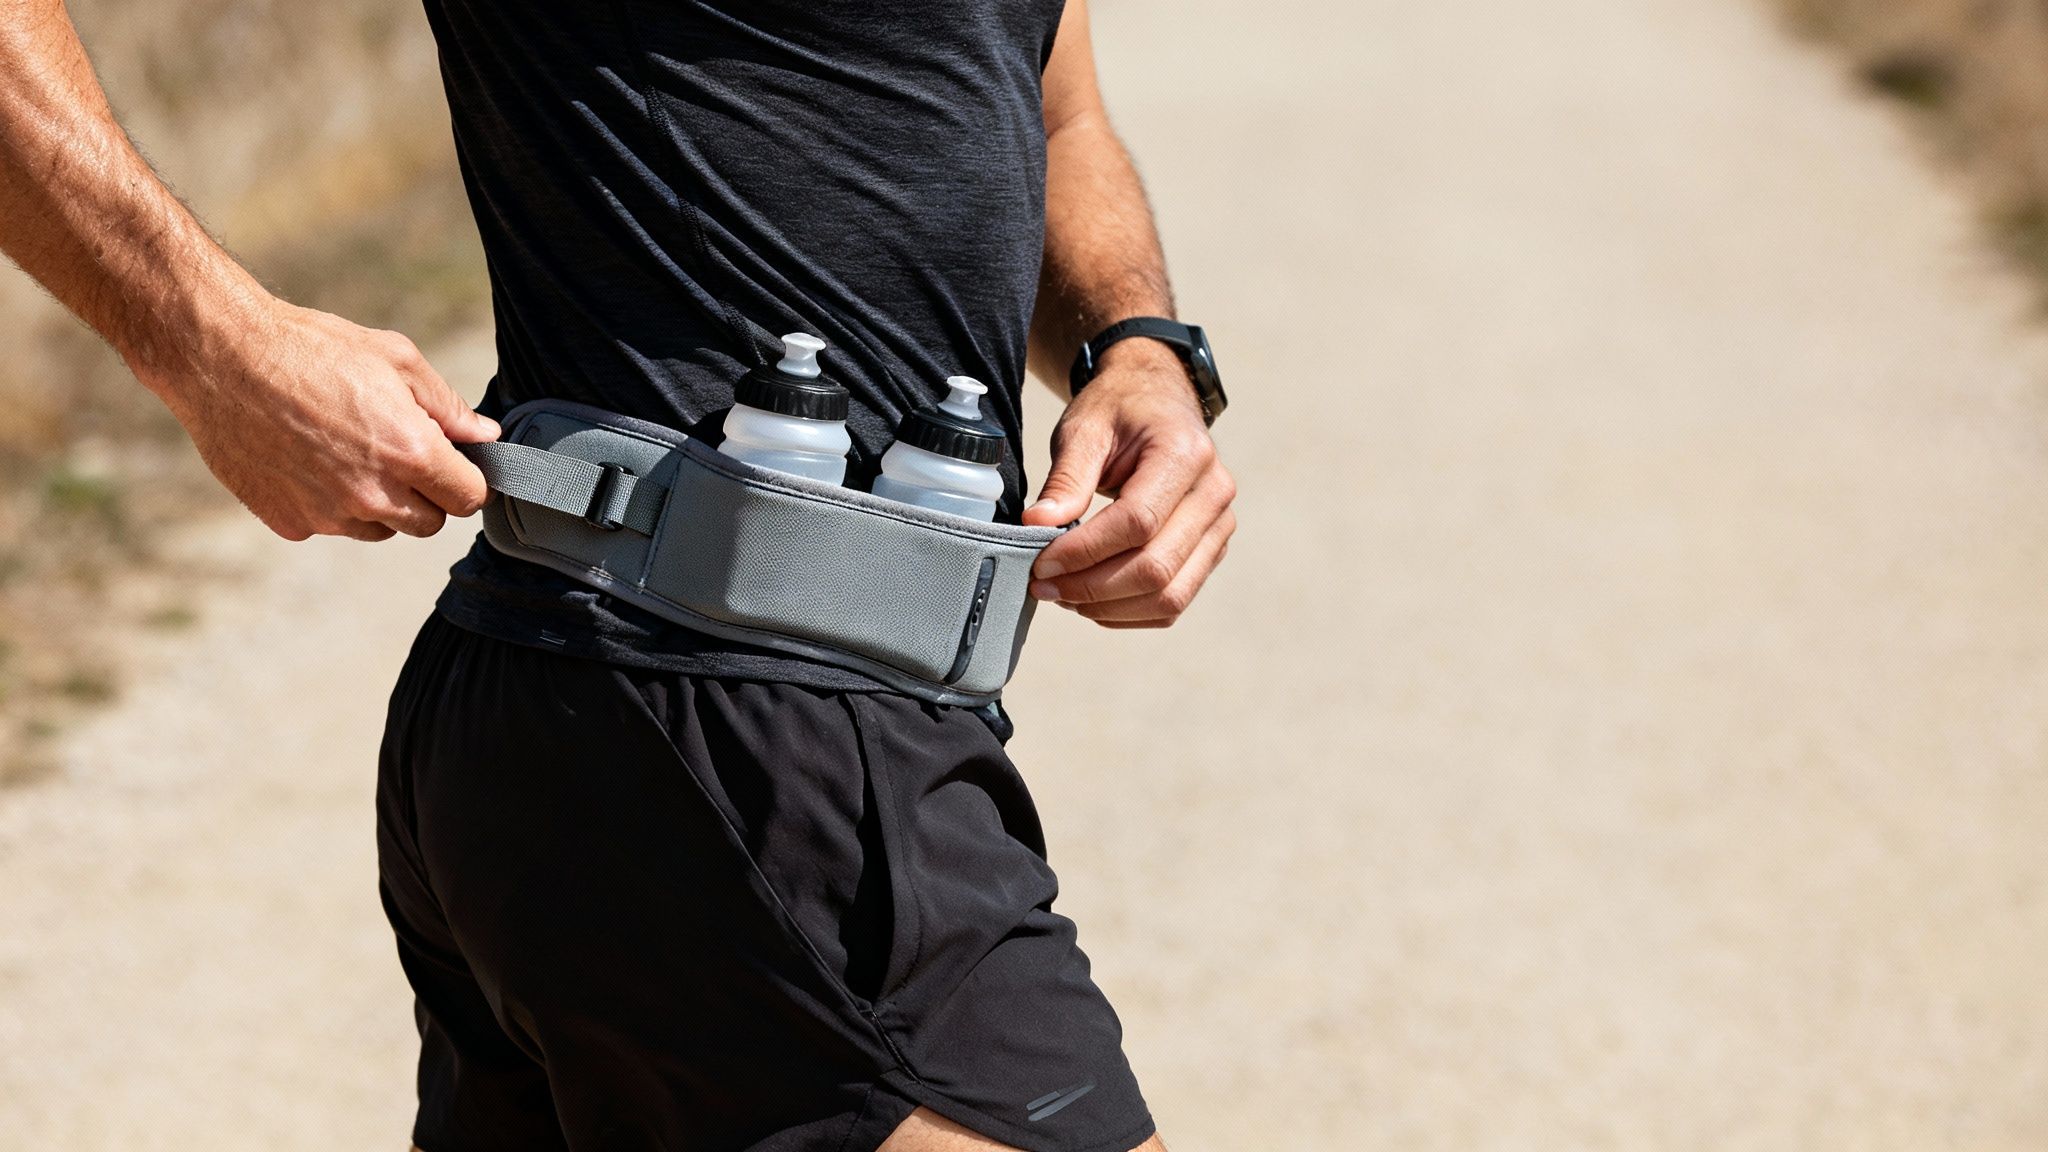
The real magic is in the weight distribution. By keeping the load centered on your hips and lower back, a belt helps you maintain a natural arm swing and better posture than you would with a handheld. Over longer distances, that small change makes a big difference in your running efficiency.
Taming the Dreaded Bounce
Let's be honest: the number one complaint about hydration belts is the bounce. Nothing is more distracting than a pack that’s jostling around with every stride. But here's the thing—it's almost always a fitting issue, not a design flaw.
Getting the fit dialed in is everything.
- Placement is Key: Don't just slap it on. Try wearing it snug against the narrowest part of your waist. Then try it lower, sitting right on top of your hip bones. Where it sits best really depends on your body shape, so play around with it.
- Cinch It Down: The belt needs to be tight enough that it doesn’t move when you do a few hops, but not so tight that it messes with your breathing. A good rule of thumb is being able to slide two fingers between the strap and your body.
- Balance the Load: An unbalanced belt is a bouncy belt. If you have two bottles, try to drink from them evenly. If you empty one, pour some water from the full one into it. This simple trick keeps the weight centered and dramatically reduces shifting.
A well-fitted hydration belt should feel like an extension of your body, not a piece of gear you're fighting. If it bounces, it’s not the belt’s fault—it’s the fit. Take five minutes before your run to dial it in.
Choosing Your Style
Hydration belts come in all shapes and sizes. You’ll find minimalist designs that hold a single 10-12 oz flask horizontally against your lower back, which can be perfect for a medium-long run on a cool day.
Then you have more robust systems with two or even four smaller bottles (6-8 oz each) sitting in angled holsters for a quick grab. These multi-bottle setups are a favorite among triathletes, whose gear choices are often a masterclass in efficiency. You can actually get some great insights from learning about what to wear for triathlons.
Think about a real-world scenario: a marathoner on a two-hour training run. They need more than just water. A belt with two 10 oz bottles and a central pouch is the perfect setup. They can fill one bottle with water, the other with an electrolyte drink, and stash four gels and a car key in the pouch. It’s a balanced, hands-free way to nail your nutrition and hydration strategy.
Conquering Long Distances with a Hydration Vest
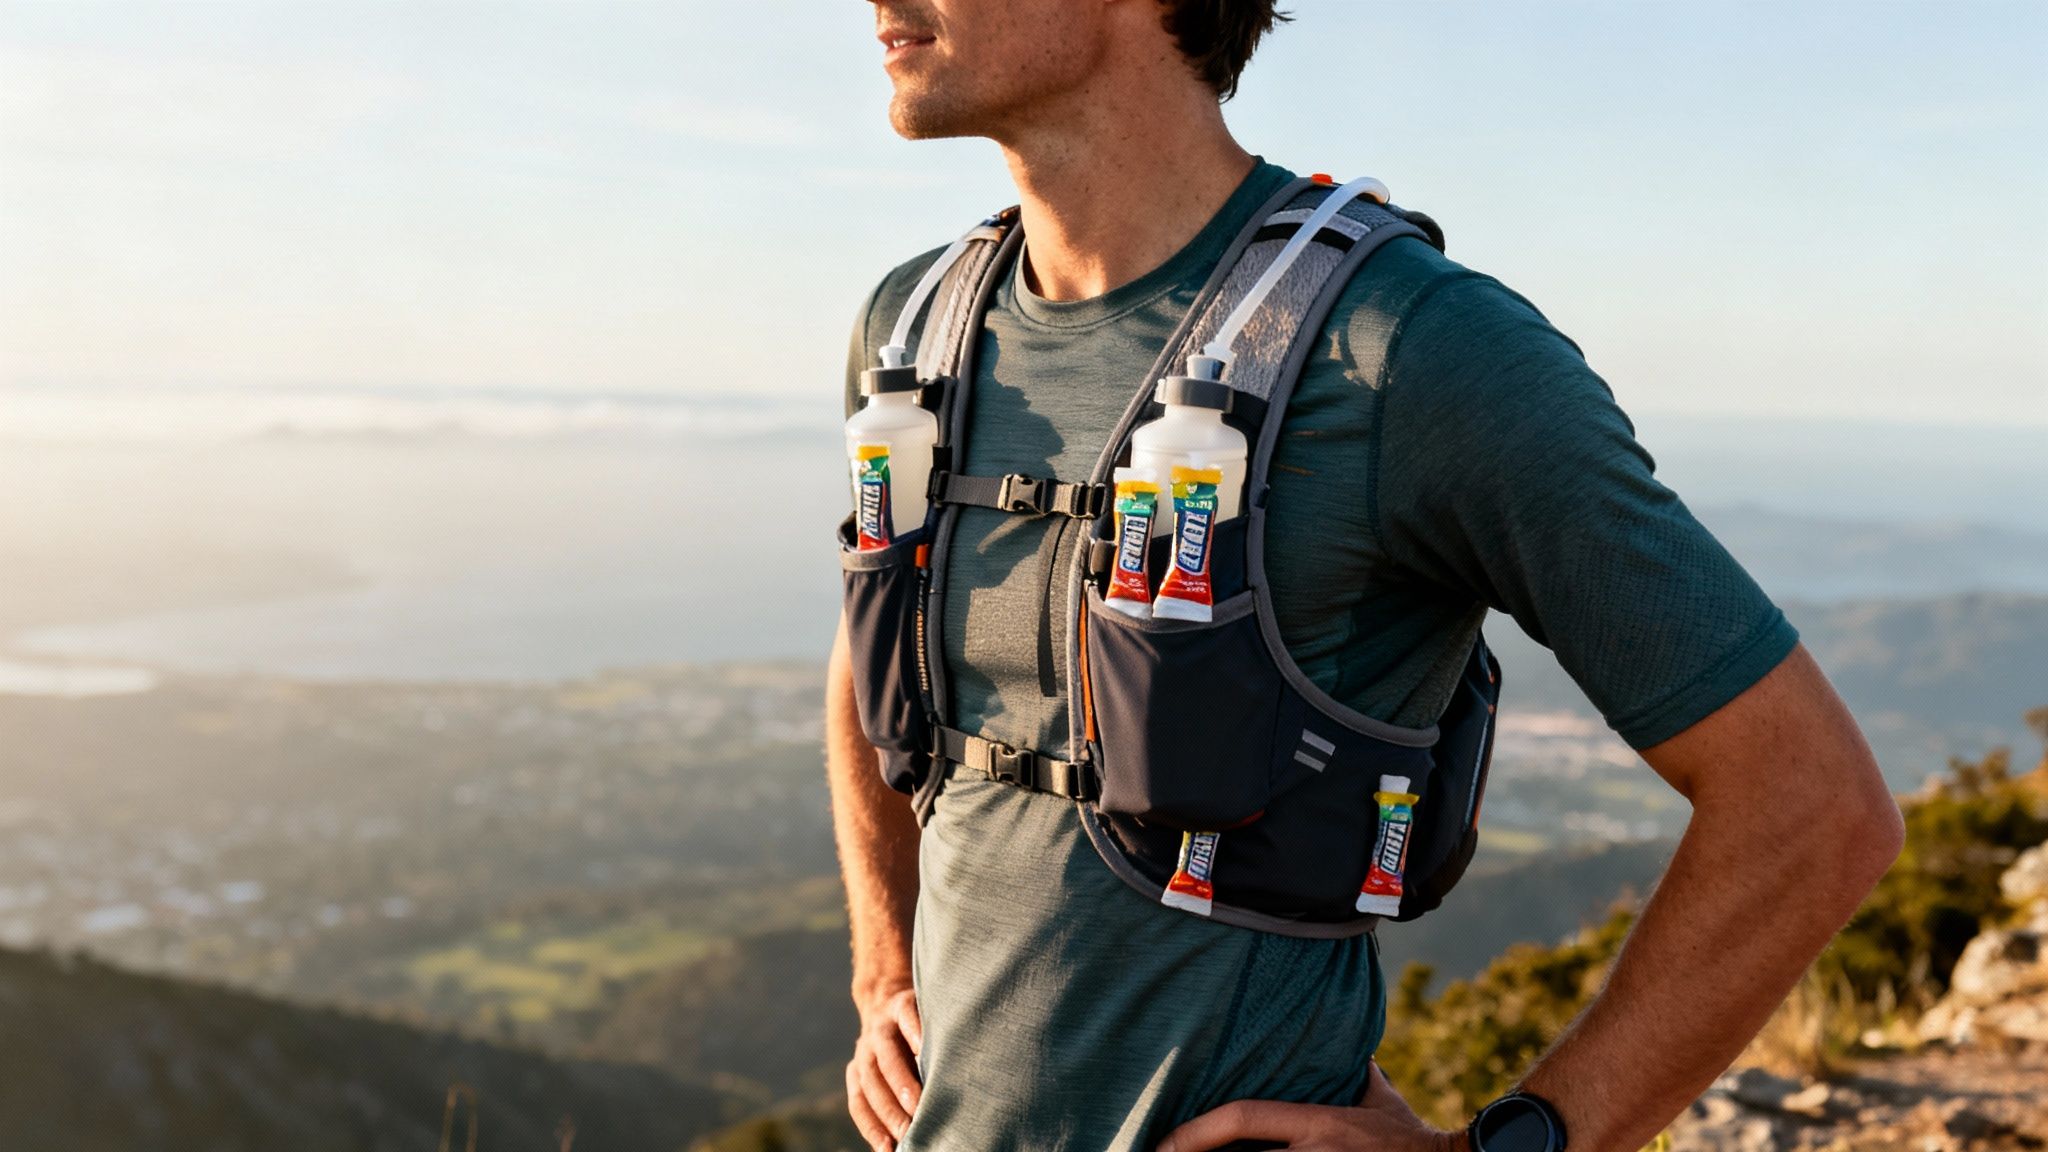
When your runs start being measured in hours, not minutes, a hydration vest stops being just a piece of gear and becomes your lifeline. For marathoners, ultrarunners, and anyone tackling a self-supported trail adventure, the vest is the undisputed king of carrying water. It's more than a water carrier; it's a mobile aid station for your fuel, extra layers, and safety essentials.
These vests are engineered to hug your torso, almost like a second skin. By distributing the weight evenly across your shoulders, chest, and back, they make the load feel much lighter than it actually is. That snug fit is everything—it cuts down on bouncing, letting you keep your running form natural and efficient, mile after mile.
Bladders vs. Soft Flasks
Your first big decision with a vest is how you want to carry your water. Most vests give you a couple of options, and some even let you use both at once.
- Front Soft Flasks: These are collapsible bottles that slide into pockets on the front shoulder straps. They're fantastic for quick sips on the move and let you see exactly how much fluid you have left at a glance. Plus, refilling them at an aid station is way faster than messing with a bladder in your pack.
- Rear Hydration Bladder: A bladder (or reservoir) is a large-capacity pouch that lives in a sleeve on your back. It typically holds 1.5L (51 oz) to 3L (101 oz) of water, which you access through a long drinking tube that clips to the front for convenience.
The undeniable advantage of a bladder is its massive volume. If you're heading out for a long, remote run with no water stops, a big reservoir is the most practical way to go. This system has completely changed how athletes approach self-supported runs.
The Real-World Impact of Carrying a Loaded Vest
While a bladder’s capacity is a huge plus, all that extra weight comes at a cost. A 2022 study examined runners carrying loads up to 3.4 kg (about 7.5 lbs), which is roughly 4-6% of their body weight. The findings showed that while a full vest didn’t significantly alter heart rate or stride over an hour, the runners definitely felt like they were working harder.
Other research has pointed out that once you start carrying 5-10% of your body weight, performance can take a hit. The cost of running goes up by about 1.16% for each extra kilogram you're carrying. This really drives home how important it is to train with the exact weight you plan to carry on race day. You can find more details in the research on carrying fluids during a run on Outside Online.
Your vest should feel like part of you, not a backpack you’re wrestling with. Try on several different brands and sizes. Load them with some weight in the store and jog in place to check for any rubbing, bouncing, or annoying pressure points.
Dialing in the Perfect Fit
Nothing will ruin a run faster than a poorly fitted vest that chafes and bounces with every step. Getting a secure, comfortable fit is absolutely non-negotiable.
First off, choose your size based on your chest measurement, not your usual t-shirt size. Once you have the vest on, start making adjustments.
- Side Straps: Cinch these first to pull the vest in against your torso. You want it snug, but not so tight that it restricts your breathing.
- Sternum Straps: Next, adjust the front straps. Most vests have two of them, and they work to keep the shoulder straps from sliding off. Tighten them until the front flasks sit flat against your chest and don't bounce around.
And remember, you’ll probably need to tweak the fit mid-run. As you drink your water, the volume and weight will drop, so a little tightening of the straps will keep that perfect, bounce-free fit.
Nailing Your Personal Hydration Strategy
Picking the right gear is half the battle, but knowing how to use it is what separates a good run from a great one. We've covered the what—now let's get into the how. Your personal hydration strategy isn't something you can just copy from a magazine; it's about listening to your body and understanding its unique needs, so you can show up strong for every training run and, of course, on race day.
The cornerstone of any solid plan is figuring out how much fluid you're actually losing. This is your sweat rate, and it’s different for everyone. It can change based on your genetics, your fitness, and whether it’s a scorching summer day or a cool fall morning. The good news? Calculating it is easier than you might think.
Figuring Out Your Personal Sweat Rate
To get a real handle on your fluid needs, try this simple test during your next hour-long run. Just make sure the conditions are similar to what you usually train in.
- Weigh yourself completely nude right before you head out the door.
- Go for your run, lasting exactly one hour. Keep track of how much you drink—for example, maybe you finish a 16 oz bottle.
- As soon as you get back, strip down, towel off any sweat, and weigh yourself again.
Time for some quick math. For every pound of body weight you lost, you're down about 16 oz of fluid. Add that to the amount you drank on the run, and you’ll have your total fluid loss for that hour. So, if you lost one pound (16 oz) and also drank 16 oz, your sweat rate is roughly 32 oz per hour for those conditions.
Knowing this number is a total game-changer. It takes the guesswork out of hydrating and gives you a real, data-driven plan. You'll know you're replacing what you're actually losing, which helps you dodge both dehydration and the less-common but equally dangerous problem of overhydration.
Practice, Practice, Practice
Once you've got your gear and a baseline for your fluid needs, the golden rule is simple: practice with your setup. I can't stress this enough—never, ever try anything new on race day. Your long runs are the perfect dress rehearsal.
Use them to mimic race conditions as closely as you can. Carry the same amount of water, use the same gels or chews, and wear the exact same kit. You'll quickly learn what works and what drives you crazy. Does your vest start to chafe after 90 minutes? Does your belt bounce around once a bottle is empty? These are the kinks you want to iron out weeks before you’re standing on that starting line. It's also the perfect time to dial in your nutrition, and you can get some great ideas on what to eat before a 10K run to make sure your fueling and hydration work together.
Alternatives to Carrying Water
Look, some runners just can't stand carrying anything. If that's you, there are definitely other ways to stay hydrated, especially during training.
- Run Loops: This is my go-to for hot days. Plan a route that circles back past your house or car. A 2-3 mile loop makes it easy to swing by for a quick drink every 15-25 minutes without being weighed down.
- Stash Your Bottles: For longer out-and-back runs, try driving the route beforehand and stashing a water bottle somewhere discreet, like behind a specific tree or signpost at your halfway point.
- Map Out Water Fountains: City runners have a great built-in option. Plan your route to pass by parks or public spaces with water fountains. Just be sure to confirm they're actually turned on before you rely on them!
These strategies take a little extra planning but are fantastic for anyone who wants to run completely free. Just make sure you have a different, rock-solid plan for race day when these tricks won't be an option.
Questions from the Trail: Your Running Hydration FAQs
Getting your hydration gear sorted is one thing, but the real questions pop up when you're actually out there logging miles. You're not the first runner to wonder about these things, and you certainly won't be the last. Let's tackle some of the most common questions we hear from runners in the real world.
How Much Water Should I Actually Carry?
This is the million-dollar question, and the honest answer is, "it depends." Your run distance, the temperature outside, and how much you personally sweat all play a huge role. But you need a place to start, right? A good rule of thumb is to plan on drinking 4-8 ounces (120-240 ml) of fluid every 15-20 minutes.
Here's how that might look on a typical run:
- Under 60 minutes (on a cool day): Honestly, you can probably skip carrying water altogether.
- 60-90 minutes: This is the sweet spot for a 16-20 ounce handheld bottle or a lightweight waist pack. It's just enough to get you through without weighing you down.
- 90+ minutes or any run in the heat: Now we're talking about a hydration vest. You'll want the capacity for 1.5L or more to stay on top of your fluid needs.
If you really want to dial it in, figure out your personal sweat rate. Just weigh yourself (with minimal clothing) before and after an hour-long run (without drinking). The difference in weight is the fluid you lost, and it gives you a precise target for rehydration.
Knowing your sweat rate takes all the guesswork out of the equation. You can build a hydration strategy that’s perfect for your body, which helps you avoid both dehydration and the dangerous mistake of over-hydrating with plain water.
Can I Put Gatorade or Other Sports Drinks in My Hydration Bladder?
You sure can! In fact, for really long and grueling runs, it’s a brilliant way to get in those essential electrolytes and calories without fumbling with gels or chews.
Just be warned: sugar is a magnet for mold and bacteria. If you put anything besides water in your bladder, you absolutely must clean it immediately after your run. No excuses. A thorough cleaning with warm, soapy water and a brush kit is non-negotiable. If you skip this, you’ll have a funky, gunky bladder in no time.
How Do I Stop My Hydration Belt From Bouncing All Over the Place?
Ah, the dreaded bouncing belt. It's incredibly annoying, but almost always fixable. It all comes down to getting the fit and balance just right.
First, play around with where you wear it. For some people, cinching it high on the narrowest part of the waist is best. For others, letting it ride low across the hips works better. Your unique body shape will determine the most stable position.
Next, get the tension right. It needs to be snug enough that it doesn't move, but not so tight that you can't breathe deeply. Finally, think about balance. If your pack has two bottles, take sips from them evenly. An unbalanced belt is a bouncing belt. A little tweaking here can make carrying water feel completely effortless.
Celebrate your running journey by turning your hard-earned miles into art. RoutePrinter creates personalized race posters of your greatest achievements. Design your custom race poster today and commemorate your finish line moment.