A Hiker's Guide to the Cascade Falls Trail

Nestled in Virginia's Jefferson National Forest, the Cascade Falls Trail is a truly unforgettable 4-mile loop hike that culminates at a magnificent 69-foot waterfall. It’s easily one of the most popular and rewarding hikes in the state, drawing you in with its stunning scenery and well-maintained path.
What to Expect on the Cascade Falls Trail
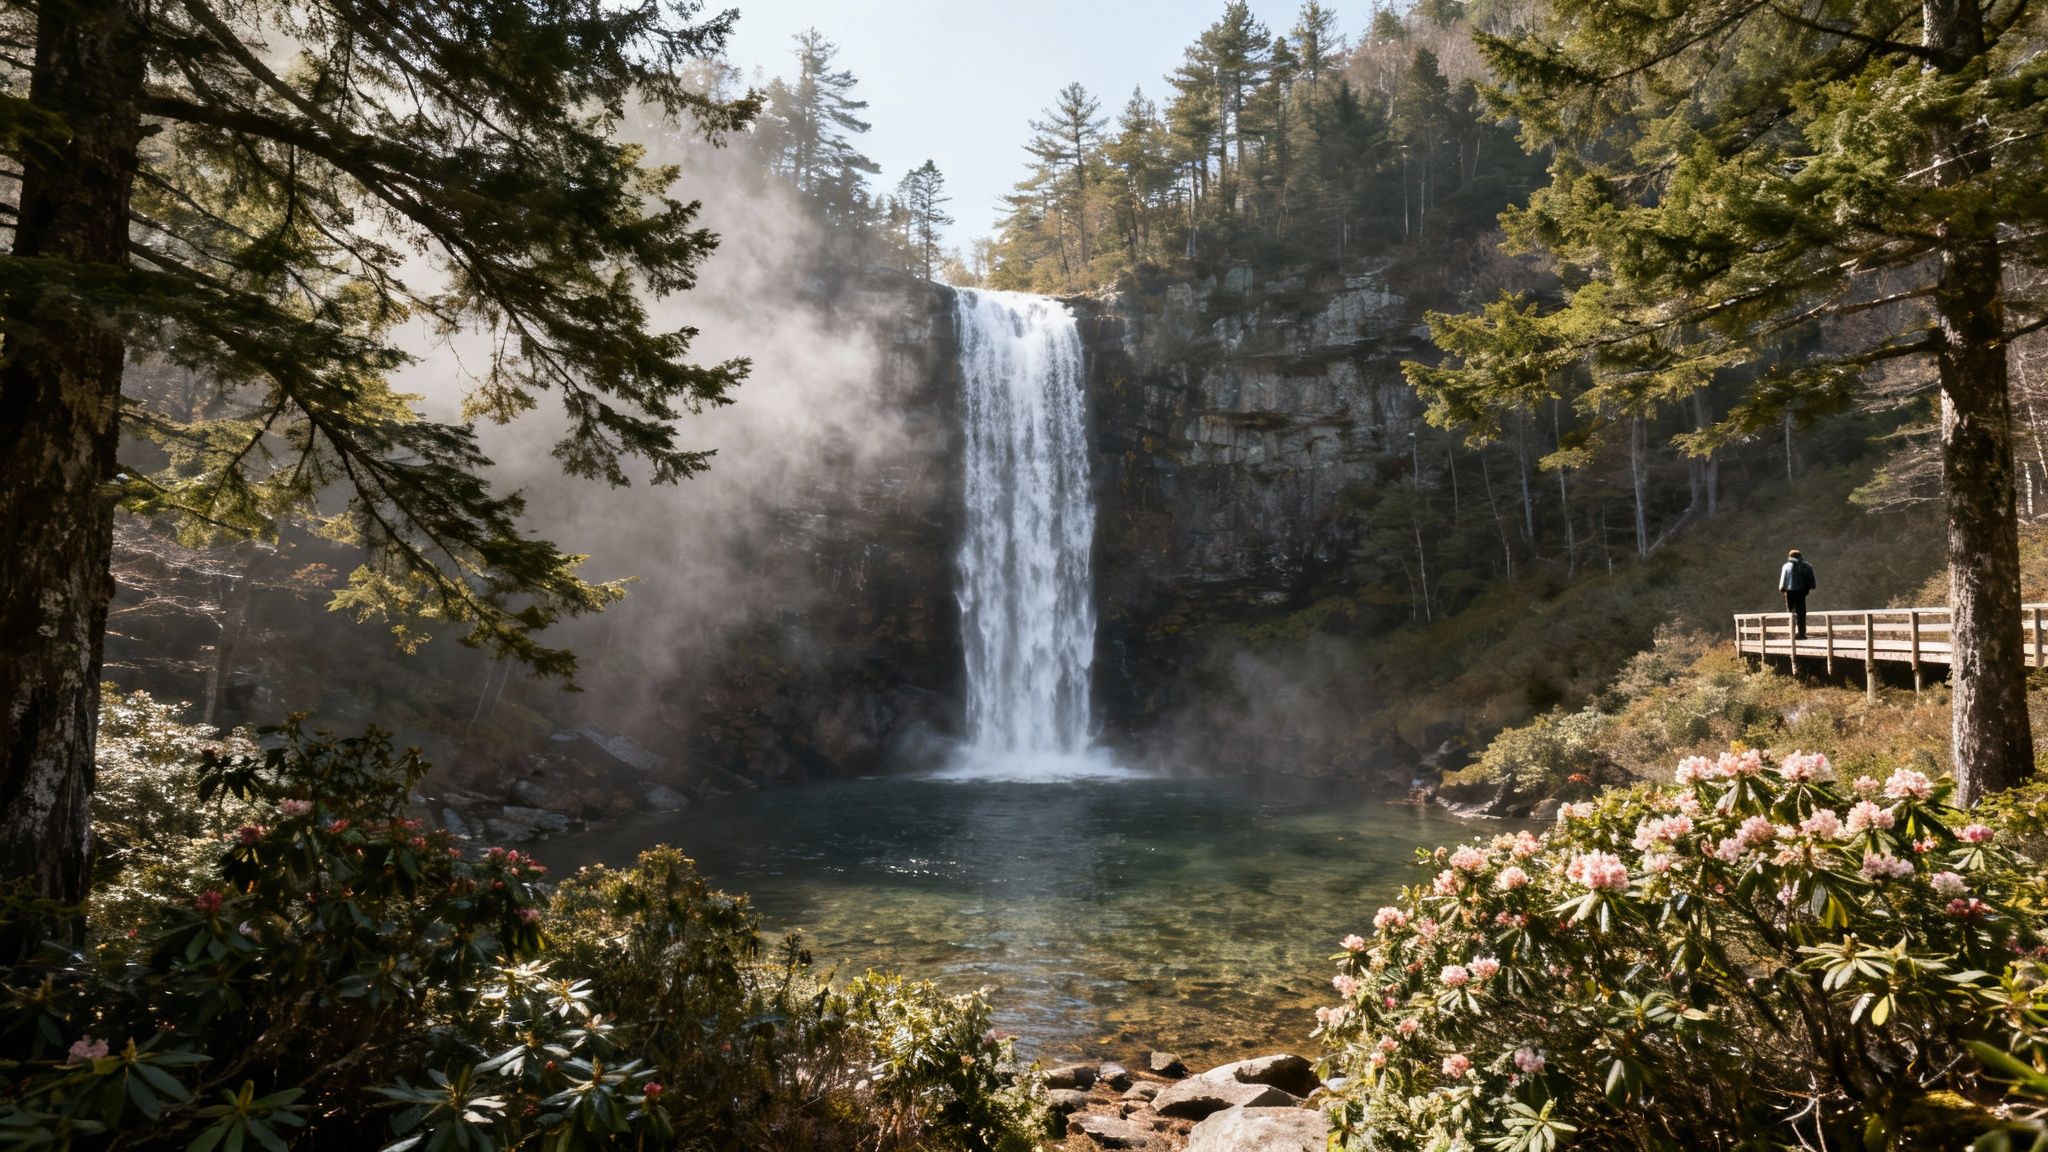
If you’re looking for one of Virginia’s most celebrated hikes, you’ve found it. This guide will walk you through everything you need to know about the Cascade Falls Trail, a gorgeous 4-mile loop that's become a bucket-list adventure for good reason. Tucked away in the Jefferson National Forest, the trail’s crown jewel is, of course, the 69-foot Cascade Falls, where Little Stony Creek makes a dramatic plunge over a sheer cliff face.
This place is no hidden secret—it's been drawing over 150,000 visitors annually for years, cementing its status as a must-see natural landmark. People travel from all over to watch Little Stony Creek cascade down into shimmering streams, creating a scene you won't soon forget. You can read more about its history over on the Roanoke Outside website.
Key Trail Features
The trail hits that sweet spot of being moderately challenging, making it a great pick for almost everyone. It’s perfect for families wanting a memorable day out, but it also delivers the scenic payoff that seasoned hikers are looking for. The path itself is well-defined, mixing natural terrain with rustic stone steps and wooden bridges that really add to the experience.
A few things that make this hike stand out:
- Two distinct paths: You get a choice. The lower trail is more rugged and follows the creek, while the upper trail is a bit wider and gentler, making for an easier return trip.
- Gorgeous scenery: Be ready for lush rhododendron tunnels, moss-covered boulders, and the constant, calming sound of the creek.
- Year-round beauty: Every season brings something new. You’ll find vibrant wildflowers in the spring and a frosty, icy wonderland in the winter.
This trail perfectly balances accessibility with a genuine sense of adventure. You don't need to be an expert hiker to enjoy it, but you'll still feel a world away from everything as you approach the falls.
This combination of an epic waterfall, approachable trails, and an enchanting forest setting solidifies its spot as one of the best hiking places around.
To help you get ready, here's a quick rundown of the trail's vital stats.
Cascade Falls Trail at a Glance
This quick-reference table breaks down the essentials so you can plan your visit with confidence.
| Metric | Details |
|---|---|
| Trail Type | Loop |
| Total Distance | 4.0 miles |
| Elevation Gain | 685 feet |
| Difficulty | Moderate |
| Time to Complete | 2-3 hours |
| Trailhead Location | Cascade Drive, Pembroke, VA |
| Fee/Permit | $3 per vehicle (cash or check) |
| Dogs Allowed | Yes, on a leash |
Having these key details in your back pocket makes planning your day that much easier. Now, let’s get into the specifics of finding the trailhead.
Finding the Trailhead and Managing Parking
Your journey to Cascade Falls starts with a beautiful drive into the Jefferson National Forest. Getting to the trailhead itself is pretty simple, but a little inside knowledge on parking and the entrance fee can save you a major headache. The trail is just a stone's throw from Pembroke, Virginia, making it an easy day trip from nearby towns.
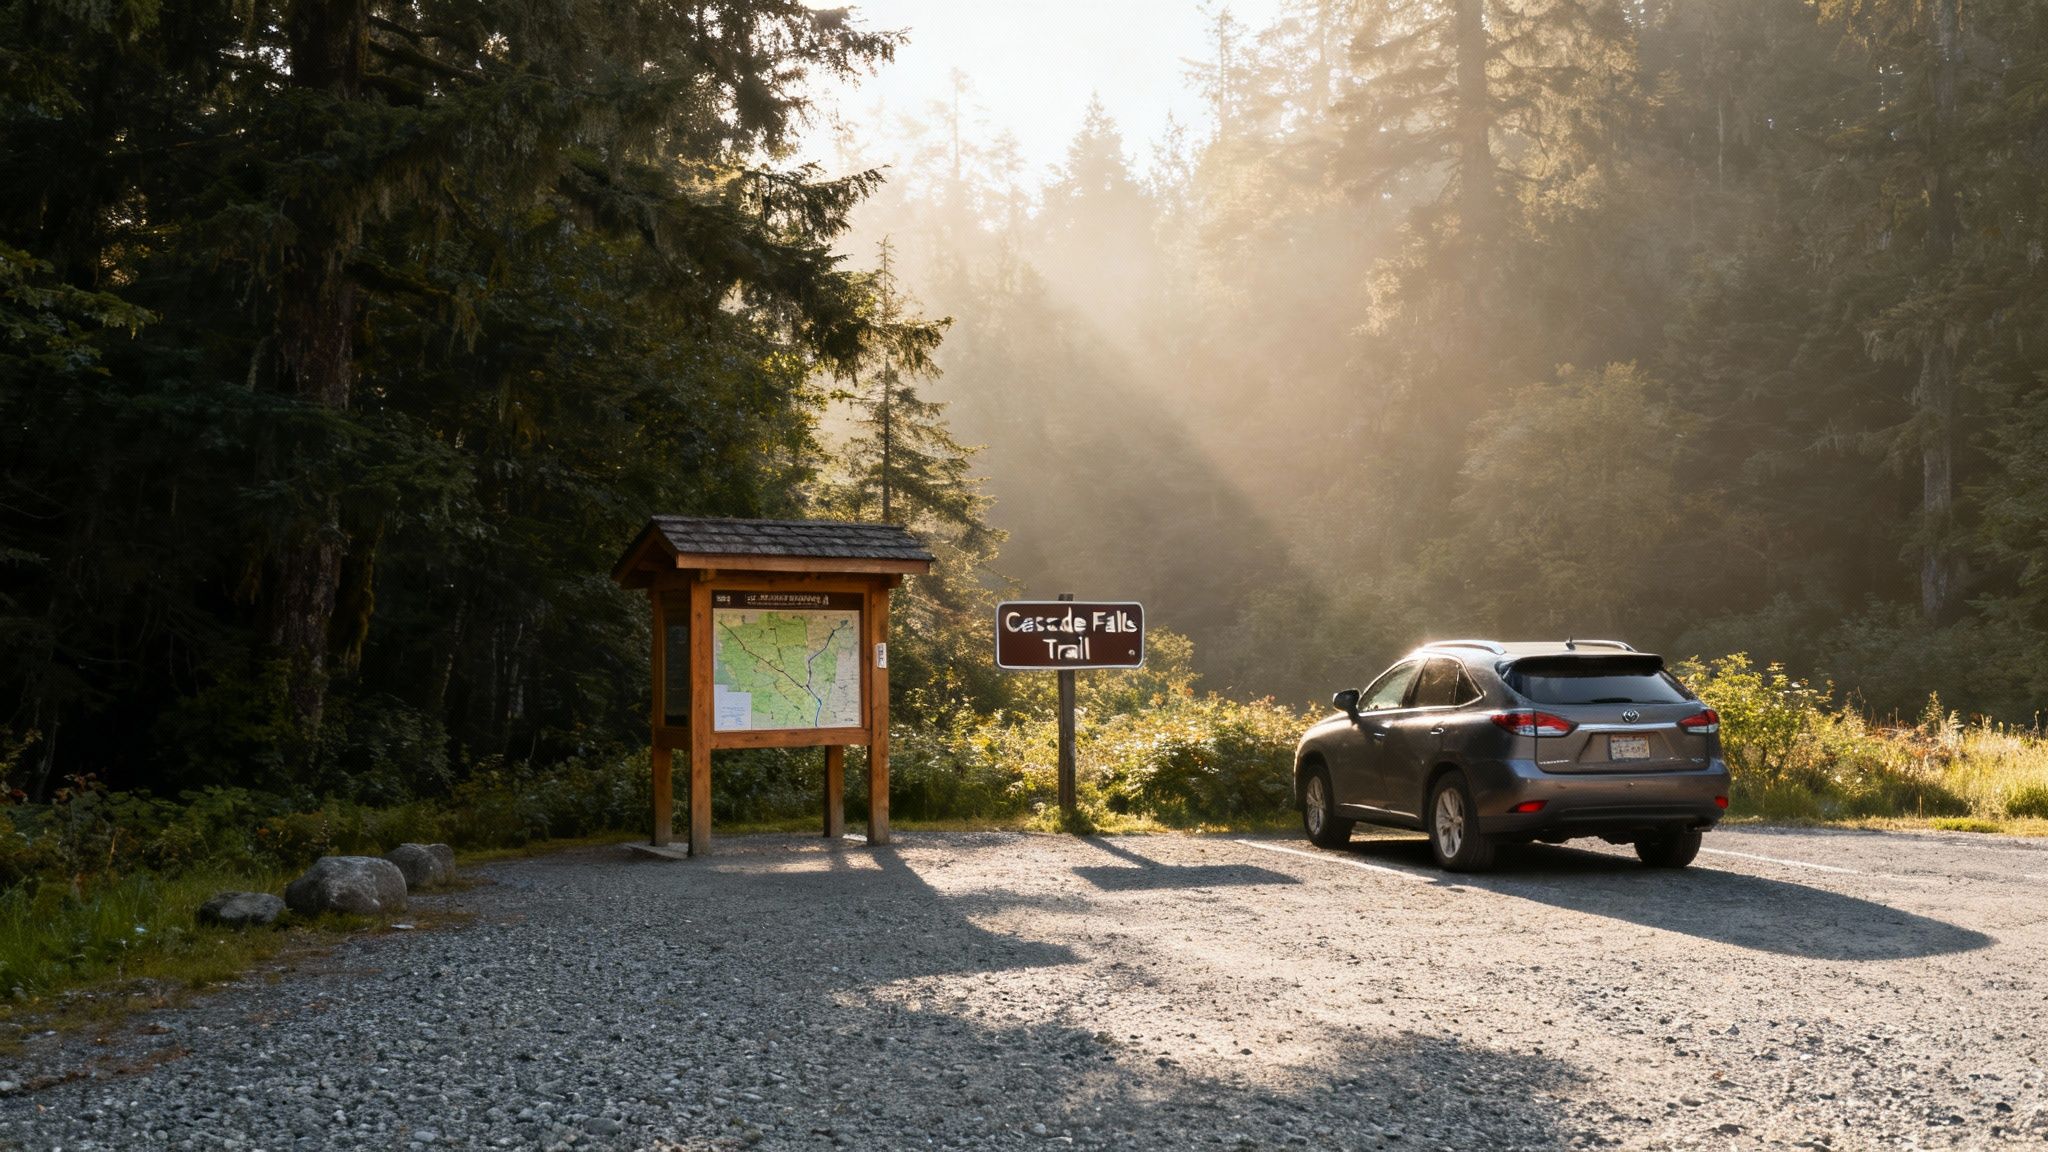
If you're coming from Blacksburg, you're looking at a 30-minute drive. From Roanoke, plan on about an hour. The last leg of the trip is on Cascade Drive (State Route 623), a paved road that gets a bit narrow as it winds toward the recreation area. The easiest way to get there? Just pop “Cascade Falls Trailhead” into your phone's map app, and it'll take you right to the entrance.
Arriving and Finding a Spot
You’ll find a large, paved parking lot right at the trailhead, which is super convenient with its restrooms and picnic tables. But don't let its size fool you. This place gets packed, especially on weekends in the summer and fall.
To avoid the frustration of circling a full lot, a little strategy goes a long way.
- Go on a Weekday: If you can swing it, hiking on a weekday is the absolute best way to guarantee easy parking and a more peaceful trail experience.
- Weekend Game Plan: If a weekend is your only option, get there early. I mean really early. Aim to arrive before 9:00 AM. Alternatively, try showing up after 3:00 PM once the morning crowd starts to clear out.
- Overflow Parking: When the main lot is inevitably full, you’ll see cars parked along the shoulder of Cascade Drive. If you have to do this, make sure you pull your vehicle completely off the pavement so you don't block traffic.
I can't stress this enough: Cascade Falls is incredibly popular. I made the mistake of showing up at 10:30 AM on a perfect Saturday in October and ended up parking nearly half a mile down the road. It added a whole extra walk just to get to the start of the hike!
Understanding the Entrance Fee
There’s a small day-use fee to access the Cascade Falls National Recreation Trail, and that money goes directly into maintaining the trail, bridges, and facilities. It's well worth it. As of our last visit, the fee is $3 per vehicle.
The payment process is a self-service system, so you'll want to come prepared.
- Cash is King: The pay station is unattended, so bring exact change or a check. You'll need to place your payment into a provided envelope.
- Fill Out the Tag: You’ll fill out a small tag with your license plate number, tear off the stub to display on your dashboard, and then drop the envelope into the fee tube. It’s a simple process, but having a pen handy helps.
- Consider a Pass: If you're a regular at national parks and forests, think about getting an annual Interagency Pass (like the America the Beautiful Pass). It covers these day-use fees at thousands of spots nationwide.
Navigating the Upper and Lower Trails
Right from the parking lot, you’re met with your first big decision: take the Upper Trail or the Lower Trail? They both get you to the waterfall, but that's where the similarities end. The path you choose completely shapes your hike.
If you ask me—or most anyone who’s hiked it—the way to go is to start with the Lower Trail for the trek to the falls. It’s the more technical and rugged of the two, but it’s also where all the magic happens. This route keeps you right beside Little Stony Creek for the entire two-mile journey. Think of it as the main event.
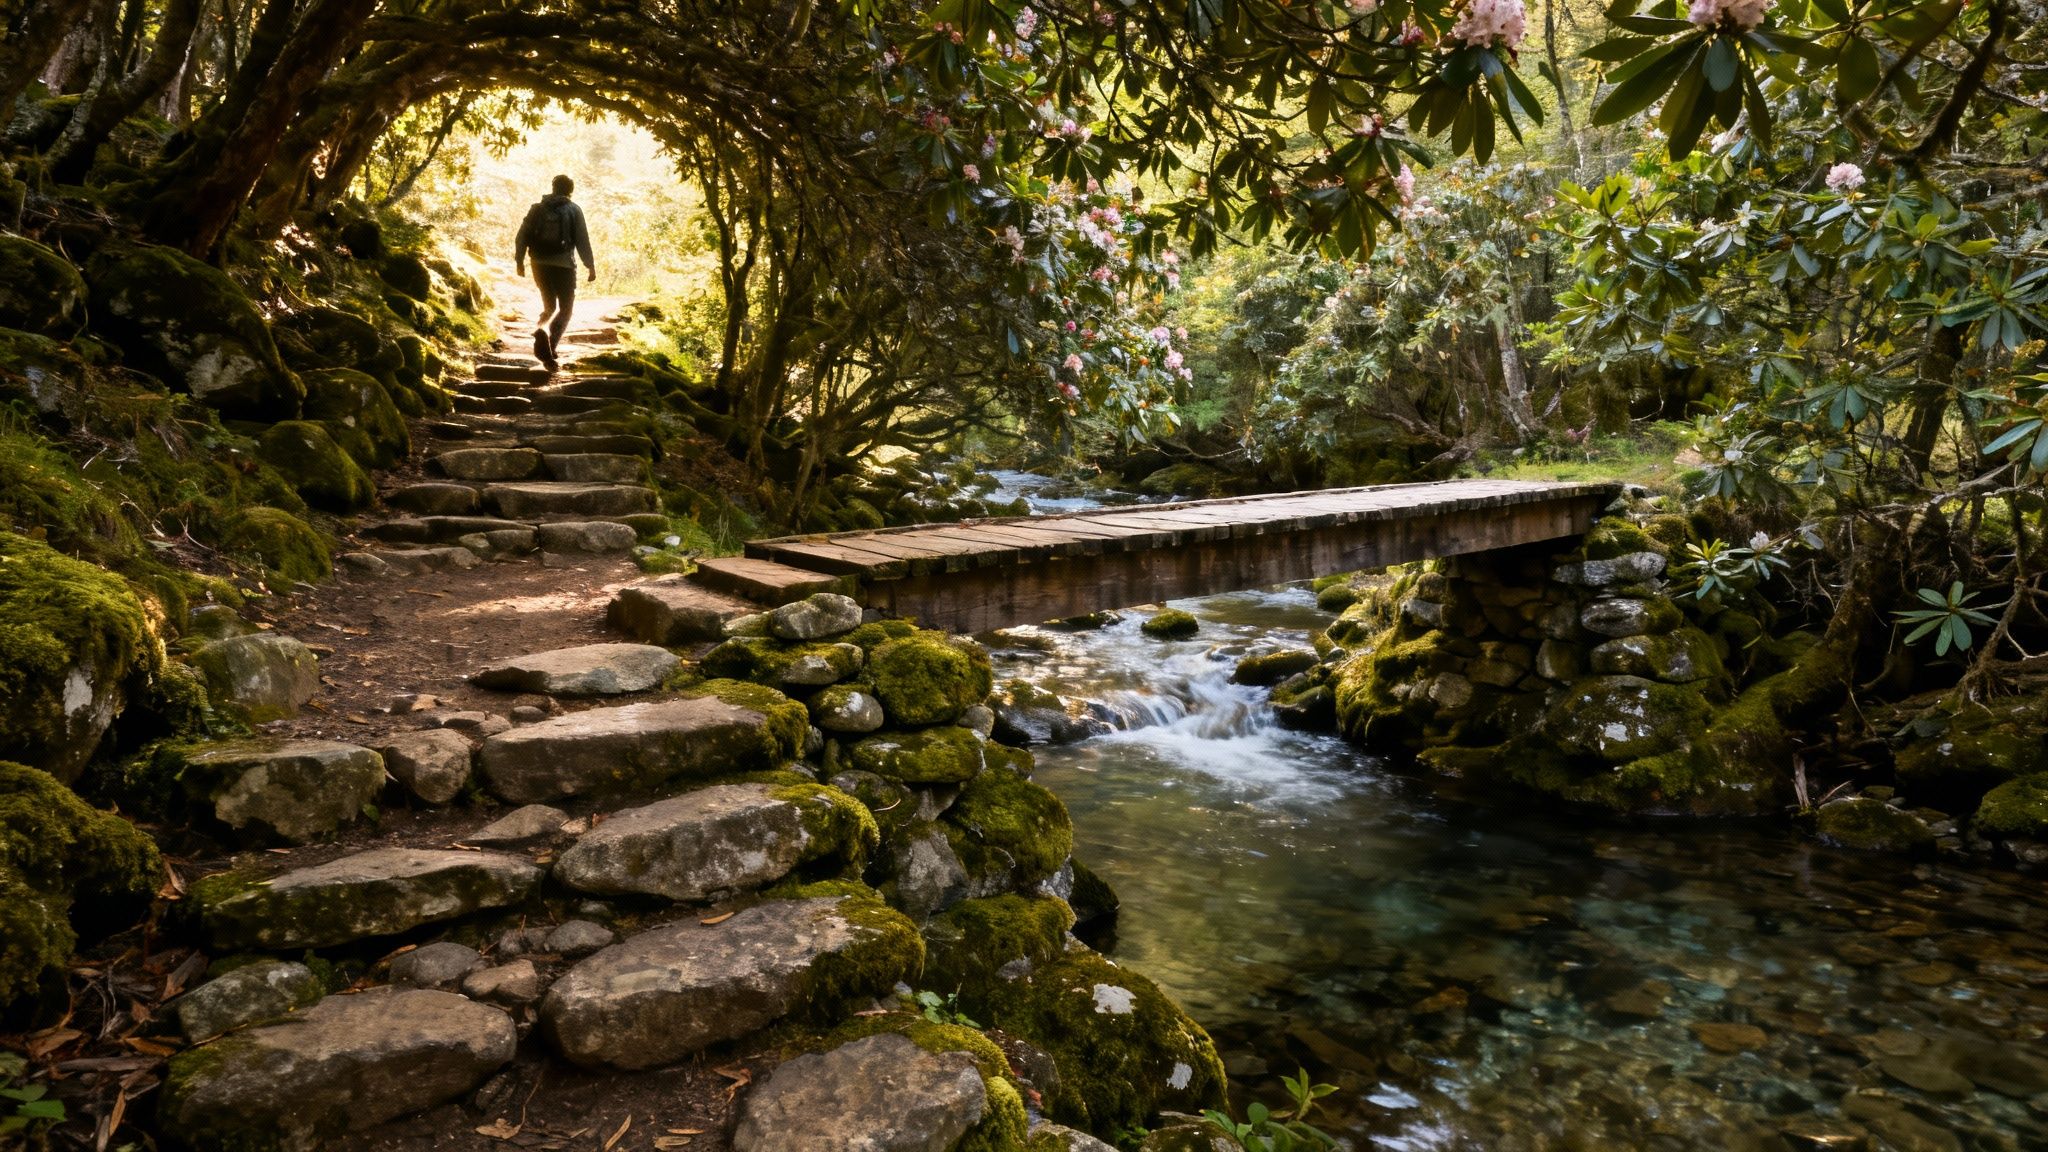
The Scenic Journey on the Lower Trail
The Lower Trail is what makes this hike so special. You're immediately immersed in the forest, with the constant, soothing sound of rushing water as your guide. Get ready for an engaging walk; the terrain is varied and keeps you on your toes.
You’ll encounter a handful of iconic features that make the trail so memorable:
- Stone Steps: These beautifully crafted stone staircases climb up and down the creek bank. Just be mindful, as they can get slick.
- Wooden Bridges: You'll cross several charming wooden bridges that offer fantastic photo ops of the creek tumbling below.
- Rhododendron Tunnels: In late spring and early summer, the trail becomes a secret passage through thick tunnels of blooming rhododendron. It's truly stunning.
This path is an experience in itself. You'll feel the cool mist from the creek, spot little cascades spilling over mossy rocks, and feel completely connected to the landscape. It's definitely the more challenging route, but the payoff is non-stop scenic beauty.
Pro Tip: Tackling the Lower Trail on the way to the falls and the Upper Trail on the way back is the classic loop. This strategy puts the best scenery and more technical sections right at the start when you're fresh, leaving a simple, straightforward walk for the return trip when you're tired.
As you get close to the two-mile mark, the distant murmur of the waterfall grows into a powerful roar. The final approach takes you up a series of wooden stairs, leading you directly to the viewing platforms for a jaw-dropping look at the 69-foot Cascade Falls.
Reaching the Falls and Choosing Your View
There are two main viewing areas here. The lower platform gets you up close and personal with the swimming hole at the base of the falls—close enough to feel the spray. From there, one last set of stairs leads to the upper platform, which gives you a breathtaking, elevated perspective of the entire cascade.
After you've soaked it all in, it's time to head back. From the upper viewing deck, you'll spot the path that connects you to the Upper Trail to complete your loop.
The Gentle Return on the Upper Trail
The Upper Trail has a completely different vibe. It’s essentially a wide, gravel service road that follows the ridge high above the creek. It’s far less technical and offers a much more gradual and steady walk back to the parking lot.
While it doesn't have the intimate, creekside charm of the Lower Trail, it has its own perks:
- Easier Terrain: The smooth, wide path is a welcome relief for tired legs and is much easier to navigate, especially if you have little ones with you.
- Faster Pace: You can cover the two miles back to the car much more quickly on this trail, making it an efficient way to wrap up the hike.
- Occasional Vistas: While it's mostly tree-covered, a few clearings pop up, offering nice, elevated views of the valley you just hiked through.
This trail is less of a scenic adventure and more of a practical route home. It’s the perfect cool-down after the sensory overload of the Lower Trail and the falls. Just follow this wide road for two miles, and it will lead you directly back to the trailhead, completing your 4-mile loop on the incredible Cascade Falls Trail.
So, How Tough Is This Hike, Really? And What Should You Pack?
Officially, the Cascade Falls Trail gets a "moderate" rating, but that doesn't quite tell the whole story. I think of it as two completely different experiences rolled into one. The Lower Trail is where you'll find the real challenge—it's a beautiful jumble of uneven stone steps, short but frequent climbs, and rocks that can get slick, especially after it rains. Then you have the Upper Trail, which is the complete opposite: a wide, gentle gravel path that's a breeze to walk.
The total climb is about 685 feet over the entire four-mile loop, and you'll tackle almost all of that on the Lower Trail as it scrambles up alongside the creek. The steepest bits are the stone and log staircases built right into the hillside. They require you to watch your step, but they're perfectly manageable for anyone with a decent level of fitness. If you're looking for an easier day out, you can absolutely just do an out-and-back on the Upper Trail for a much flatter walk.
The real wild card on this trail is the weather. On a dry, sunny day, the Lower Trail is a ton of fun. But after a good downpour, those charming stone steps become slick and demand a lot more respect, forcing you to slow way down.
How Long Will It Actually Take?
Your time on the trail will really depend on your pace and how long you decide to hang out at the waterfall. Honestly, this isn't a hike to be rushed; the journey along the creek is a huge part of what makes it so special.
- Families with Kids: I'd budget 3 to 4 hours. This gives you plenty of time for snack breaks, letting the little ones poke around the creek, and taking it slow on the trickier sections.
- Average Hikers: Most folks will find 2 to 3 hours is the sweet spot. You can enjoy the scenery, snap photos, and never feel like you're in a hurry.
- Trail Runners: If you're out for a workout, you could knock this out in 1.5 hours or less. Just know that the rocky, technical terrain on the Lower Trail will definitely force you to slow your roll.
Your Gear Checklist: The Non-Negotiables
Being prepared is what separates a fantastic day from a miserable one. You don't need a ton of fancy equipment for Cascade Falls, but a few key items are absolutely essential for your safety and comfort.
What to Wear
- Good Hiking Shoes or Boots: This is the single most important thing. You need solid grip for wet rocks and good ankle support for the uneven ground. Don't even think about doing this in flip-flops.
- Moisture-Wicking Layers: Ditch the cotton. Stick with synthetic or wool layers that you can easily peel off as you warm up on the climb and put back on when you cool down.
- Rain Jacket: Even if the forecast looks perfect, toss a light, waterproof jacket in your pack. Mountain weather is fickle, and the mist from the falls can be surprisingly chilly.
Fuel and Water
- Plenty of Water: Bring at least 1 liter per person. You’ll be sweating more than you think on those inclines.
- Salty Snacks: Things like trail mix, granola bars, or pretzels are perfect for replenishing electrolytes and keeping your energy from tanking.
Smart Extras for a Better Hike
Beyond the absolute must-haves, a couple of other things can make a huge difference.
- Trekking Poles: I highly recommend these, especially for the descent. They give you a massive stability boost on slippery steps and save your knees from a lot of punishment.
- Small First-Aid Kit: Just the basics—bandages, antiseptic wipes, blister care. It’s one of those things you hope you never need, but you’ll be glad you have it if you do.
- Sun Protection: A hat, sunglasses, and sunscreen are crucial. The Upper Trail, in particular, has some long, exposed stretches.
Packing smart means you can relax and just soak in the incredible scenery of Cascade Falls. If this sounds a bit more rugged than what you're in the mood for, you might want to check out our guide to some other fantastic easy hiking trails that still deliver big on views.
Making Your Cascade Falls Hike Unforgettable
The hike to Cascade Falls is one of those adventures that really sticks with you. Long after you've kicked off your dusty boots, the sound of the roaring water and the sight of the lush canyon remain. Beyond just snapping a few photos, there are some really cool ways to capture and remember your day on the trail.
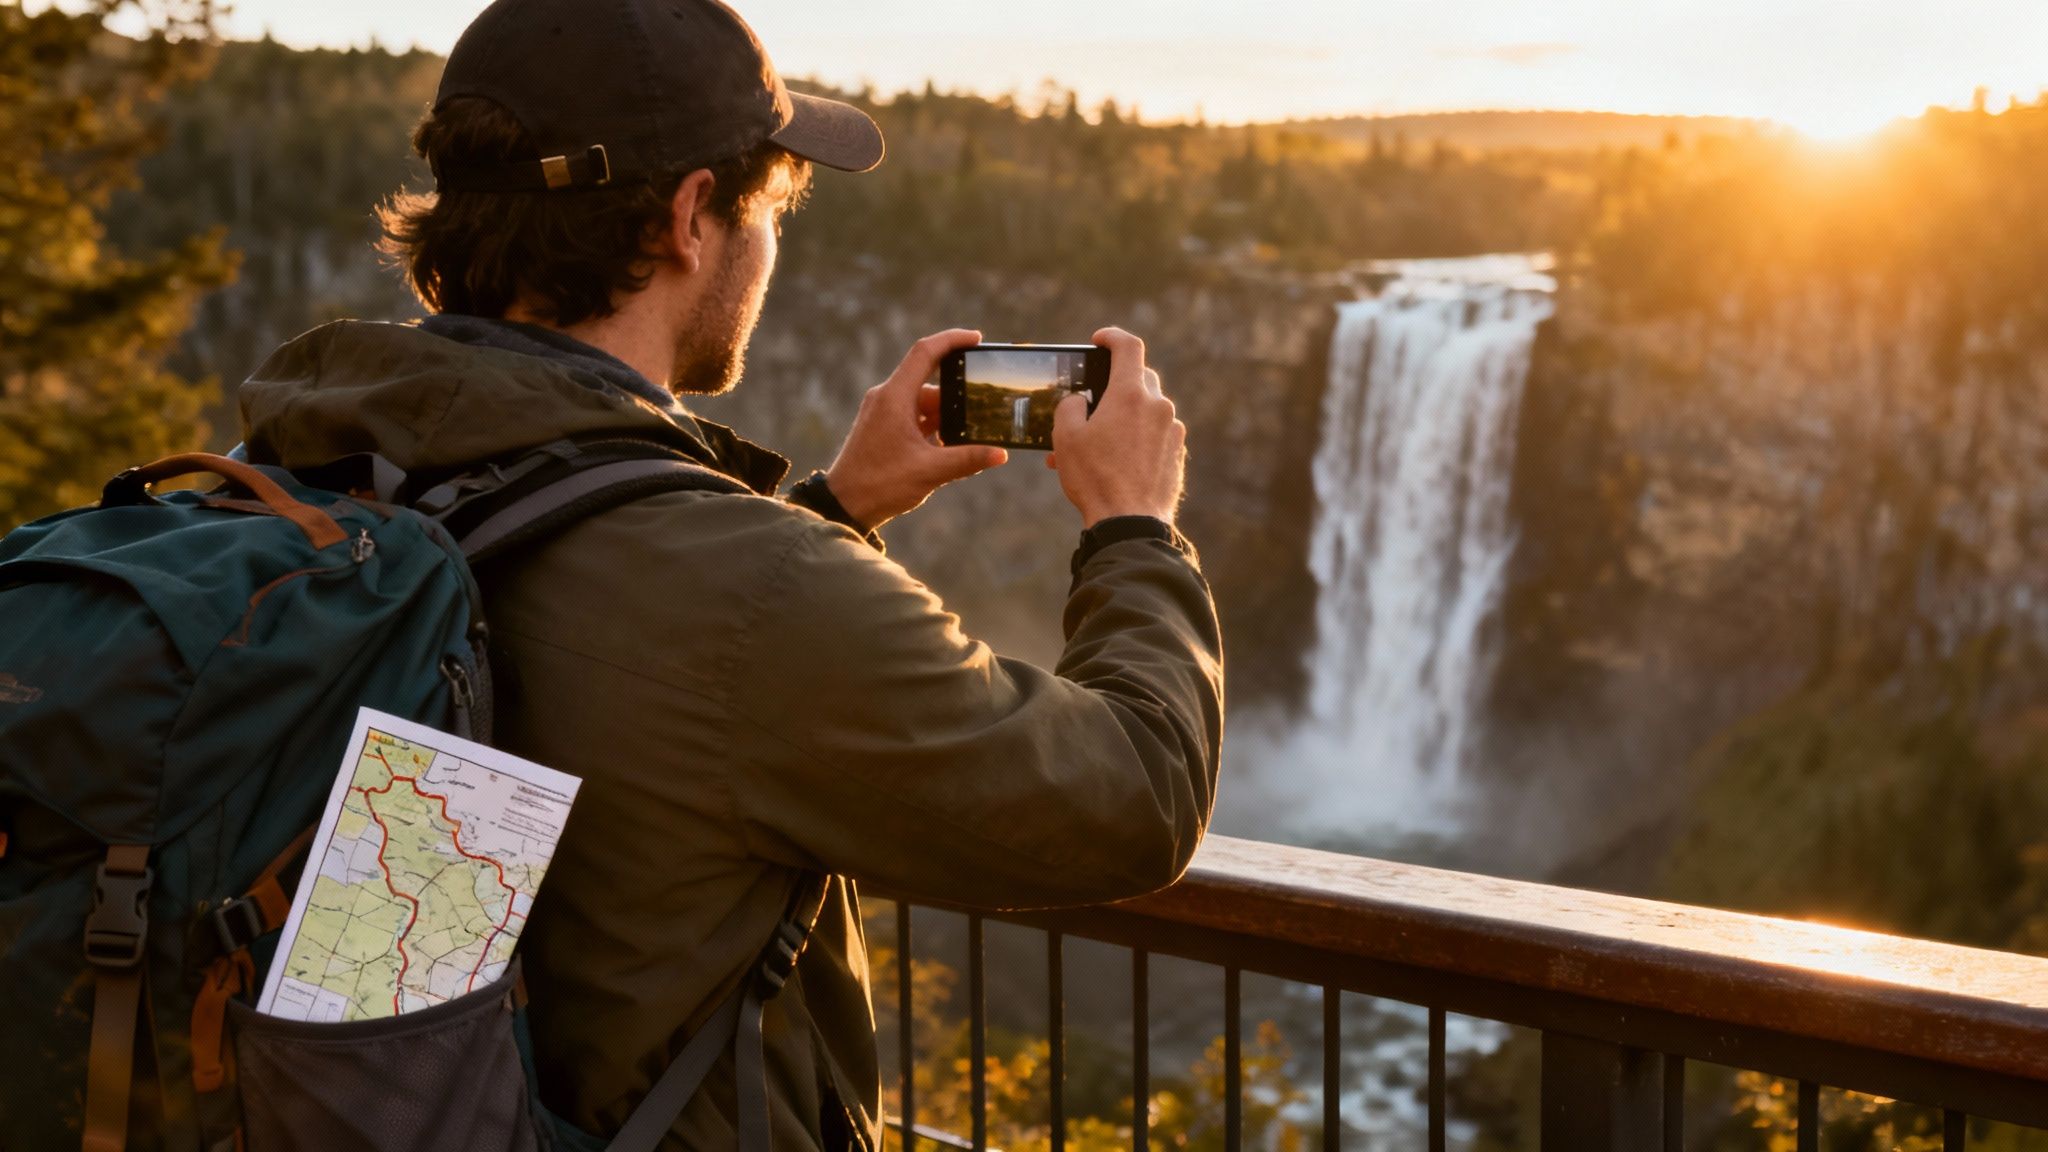
This trail is incredibly photogenic, from the rustic wooden bridges crossing the creek to the jaw-dropping view of the falls themselves. A few spots, in particular, are practically begging to be photographed.
Finding the Perfect Shot
As you follow Little Stony Creek on the Lower Trail, you'll find the best photo ops. Keep your camera or phone ready for these can't-miss scenes:
- The Wooden Bridges: These are perfect for framing your shot. Use the bridge's railings as leading lines to pull the eye deeper into the forest, with the creek and rhododendrons creating a classic mountain scene.
- Creek-Level Views: Find a safe spot to scramble down to the rocky creek bed. Getting a low-angle shot looking up at the water tumbling over mossy rocks adds a ton of drama and perspective.
- The Viewing Platforms: You get two fantastic perspectives here. The lower platform puts you right in the action, capturing the raw power of the 69-foot falls. Head up to the upper platform for a wider, more panoramic view of the entire scene.
Pro tip for waterfall photography: Go on an overcast day if you can. The clouds act like a giant softbox, giving you even, diffused light. This prevents harsh, blown-out highlights on the water and lets you capture that silky-smooth look with a slightly longer exposure.
Log Your Journey with GPS
Before you hit the trail, fire up a GPS tracking app like Strava on your phone or GPS watch. Hitting "record" does more than just track your stats—it creates a digital breadcrumb trail of your exact path.
This isn't just about mileage and elevation. It's your personal story of the hike. You can look back at the data and see exactly where you slowed down on the climbs and where you picked up the pace. It’s a fantastic digital souvenir of your accomplishment.
Turn Your Hike into a Piece of Art
What do you do with that GPS track after the hike? Don't just let it get buried in your activity feed. You can turn that digital line into something tangible and beautiful.
A service called RoutePrinter takes your GPS data and transforms it into a clean, minimalist art print. You can get a custom poster for your wall that shows the exact four-mile loop you hiked, maybe with your time or the date printed on it.
It's a really modern and meaningful way to commemorate your achievement. You can easily design your own custom route poster and create a keepsake that reminds you of the burn in your legs and the incredible reward waiting at the end.
Your Cascade Falls Hiking Questions, Answered
Planning any hike comes with a few questions. To make sure you have everything sorted before you hit the trail, I've put together answers to the things hikers ask most often about Cascade Falls. This way, you can show up ready to go.
Is This a Good Hike for Kids and Dogs?
It absolutely is. You'll see plenty of happy families and four-legged friends out here. Dogs are welcome as long as they stay on a leash, and the trail is a great fit for active kids, usually around 7 years old and up.
The trick is picking the right route for your crew. The Lower Trail is more rugged and has some slippery stone steps that will require you to keep a close eye on the little ones. For an easier time, many families stick to the wider, gentler Upper Trail. A popular strategy is to take the more scenic Lower Trail on the way to the falls, then loop back on the easier Upper Trail when everyone's energy is starting to fade.
Can You Go for a Swim at the Falls?
You bet! Taking a dip in the big, beautiful pool at the base of the waterfall is one of the best parts of this hike, especially on a sweltering summer day. It's the perfect reward after the two-mile walk in.
Just be ready for a shock—that mountain water is seriously cold, even in the middle of August. The rocks around the edge and leading into the water can also be incredibly slick, so watch your footing. It’s a popular spot, so please be mindful of other hikers who are just there to enjoy the view from the shoreline.
When Is the Best Time of Year to Go?
Honestly, Cascade Falls is incredible no matter when you visit. Each season just gives the trail a completely different vibe.
- Spring: This is when the wildflowers pop, and the waterfall is usually roaring at its peak, fed by all the snowmelt.
- Summer: Peak season for a reason. The forest is a lush, vibrant green, and it's prime time for swimming. Expect to share the trail with plenty of other people.
- Autumn: My personal favorite. The air is cool and crisp, and the fall colors are absolutely spectacular. It's a photographer's paradise.
- Winter: A completely different world. The frozen waterfall is a magical sight, but the trail gets icy and dangerous. You'll definitely need microspikes for traction on the steps.
If you're looking for that sweet spot with great weather, beautiful scenery, and fewer people, I'd aim for late spring or early fall.
Are There Restrooms at the Trailhead?
Yep, you're covered. There are vault toilets located right at the main parking and picnic area. They're usually kept in decent shape. Make sure to use them before you start your hike, because there are no other facilities once you're on the trail.
Your hike on the Cascade Falls trail is an adventure worth remembering. You can turn that GPS track from your watch or phone into a beautiful piece of minimalist art with RoutePrinter. Design your custom route poster today and create a lasting memento of your day on the trail.