How to Display Running Medals and Tell Your Story

The simplest and fastest way to get your medals out of a drawer and onto the wall is with a dedicated medal hanger. They’re affordable, a breeze to install, and get the job done. But if you're looking for something with a bit more personality, you might consider a custom shadow box or even a unique DIY project.
Exploring Your Medal Display Options
Every medal you've earned tells a story of hard work, early morning runs, and pushing past your limits. These aren't just pieces of metal; they're symbols of achievement that deserve to be seen. Choosing the right display method transforms them from a tangled pile in a drawer into an inspiring piece of art that celebrates your journey.
The best approach really comes down to your space, personal style, and just how many medals you've collected over the years. Whether you're a new runner with a single 5k medal or a seasoned veteran with dozens, there's a solution that fits.
Comparing Popular Display Methods
To give you a better idea of what's out there, let's take a quick look at the most common options side-by-side.
Medal Display Methods at a Glance
This table breaks down the most popular choices to help you find the perfect fit for your collection and your home.
| Display Method | Best For | Average Cost | Customization Level |
|---|---|---|---|
| Medal Hanger | Displaying many medals simply and efficiently | £16 - £50 | Low to Medium |
| Shadow Box | Showcasing a specific, meaningful race | £20 - £100 | High |
| DIY Project | A completely unique and personalized display | £10 - £60+ | Very High |
| Corkboard | A flexible, evolving display of race mementos | £15 - £40 | Medium |
Each method has its own charm. Medal hangers are the go-to for many runners because they’re so straightforward, while shadow boxes and DIY solutions let you get creative and tell a deeper story.
Finding a Solution for Any Budget
You don’t have to spend a fortune to create an impressive display. Entry-level medal hangers are very affordable, often starting around £16 to £35. Mid-range options, which might offer more intricate designs or customization, typically run between £50 and £100.
Capacity is another key factor. Some basic hangers are designed to hold around 20 medals, while larger, multi-tiered models can easily accommodate 40 to 48 medals without looking cluttered. It’s worth checking out some of the best race medal holders to see the huge variety available.
Choosing how to display running medals is about more than just organization; it’s about honoring your commitment. The right display turns your achievements into a daily source of motivation.
A really powerful way to tell your race day story is to pair the medal with a visual of the course itself. Imagine a gallery wall where one of our marathon posters is featured with the corresponding medal hanging just below it. This combination gives you the full picture—the route you conquered and the prize you earned at the finish line.
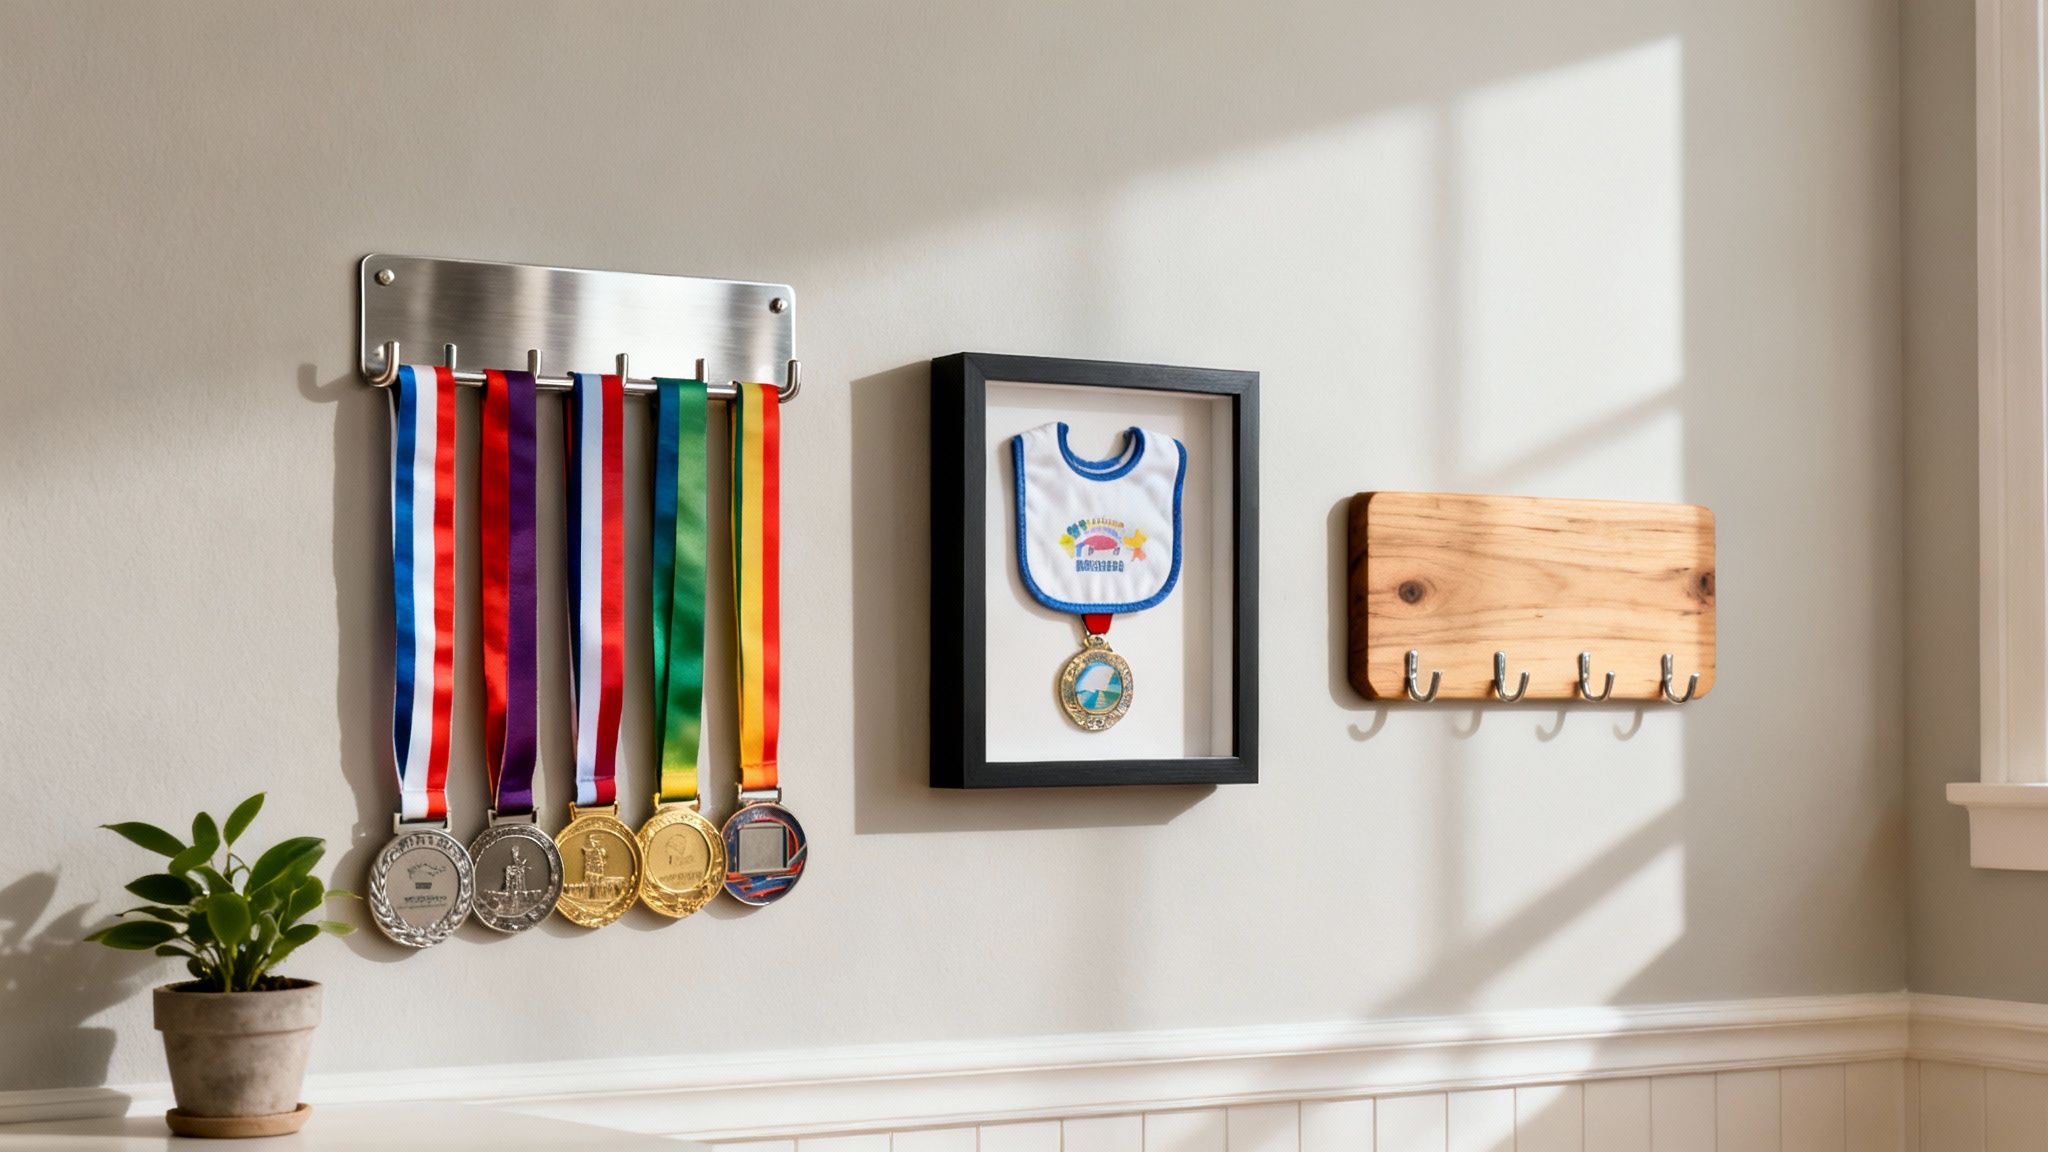
Finding the Perfect Medal Hanger for Your Wall
Let's be honest, that drawer full of tangled race medals isn't doing them justice. A dedicated medal hanger is one of the best and most popular ways to get your hard-earned bling out of the dark and onto the wall. It’s a clean, organized solution that transforms your collection from clutter into a real focal point—a visual timeline of every start line and every finish.
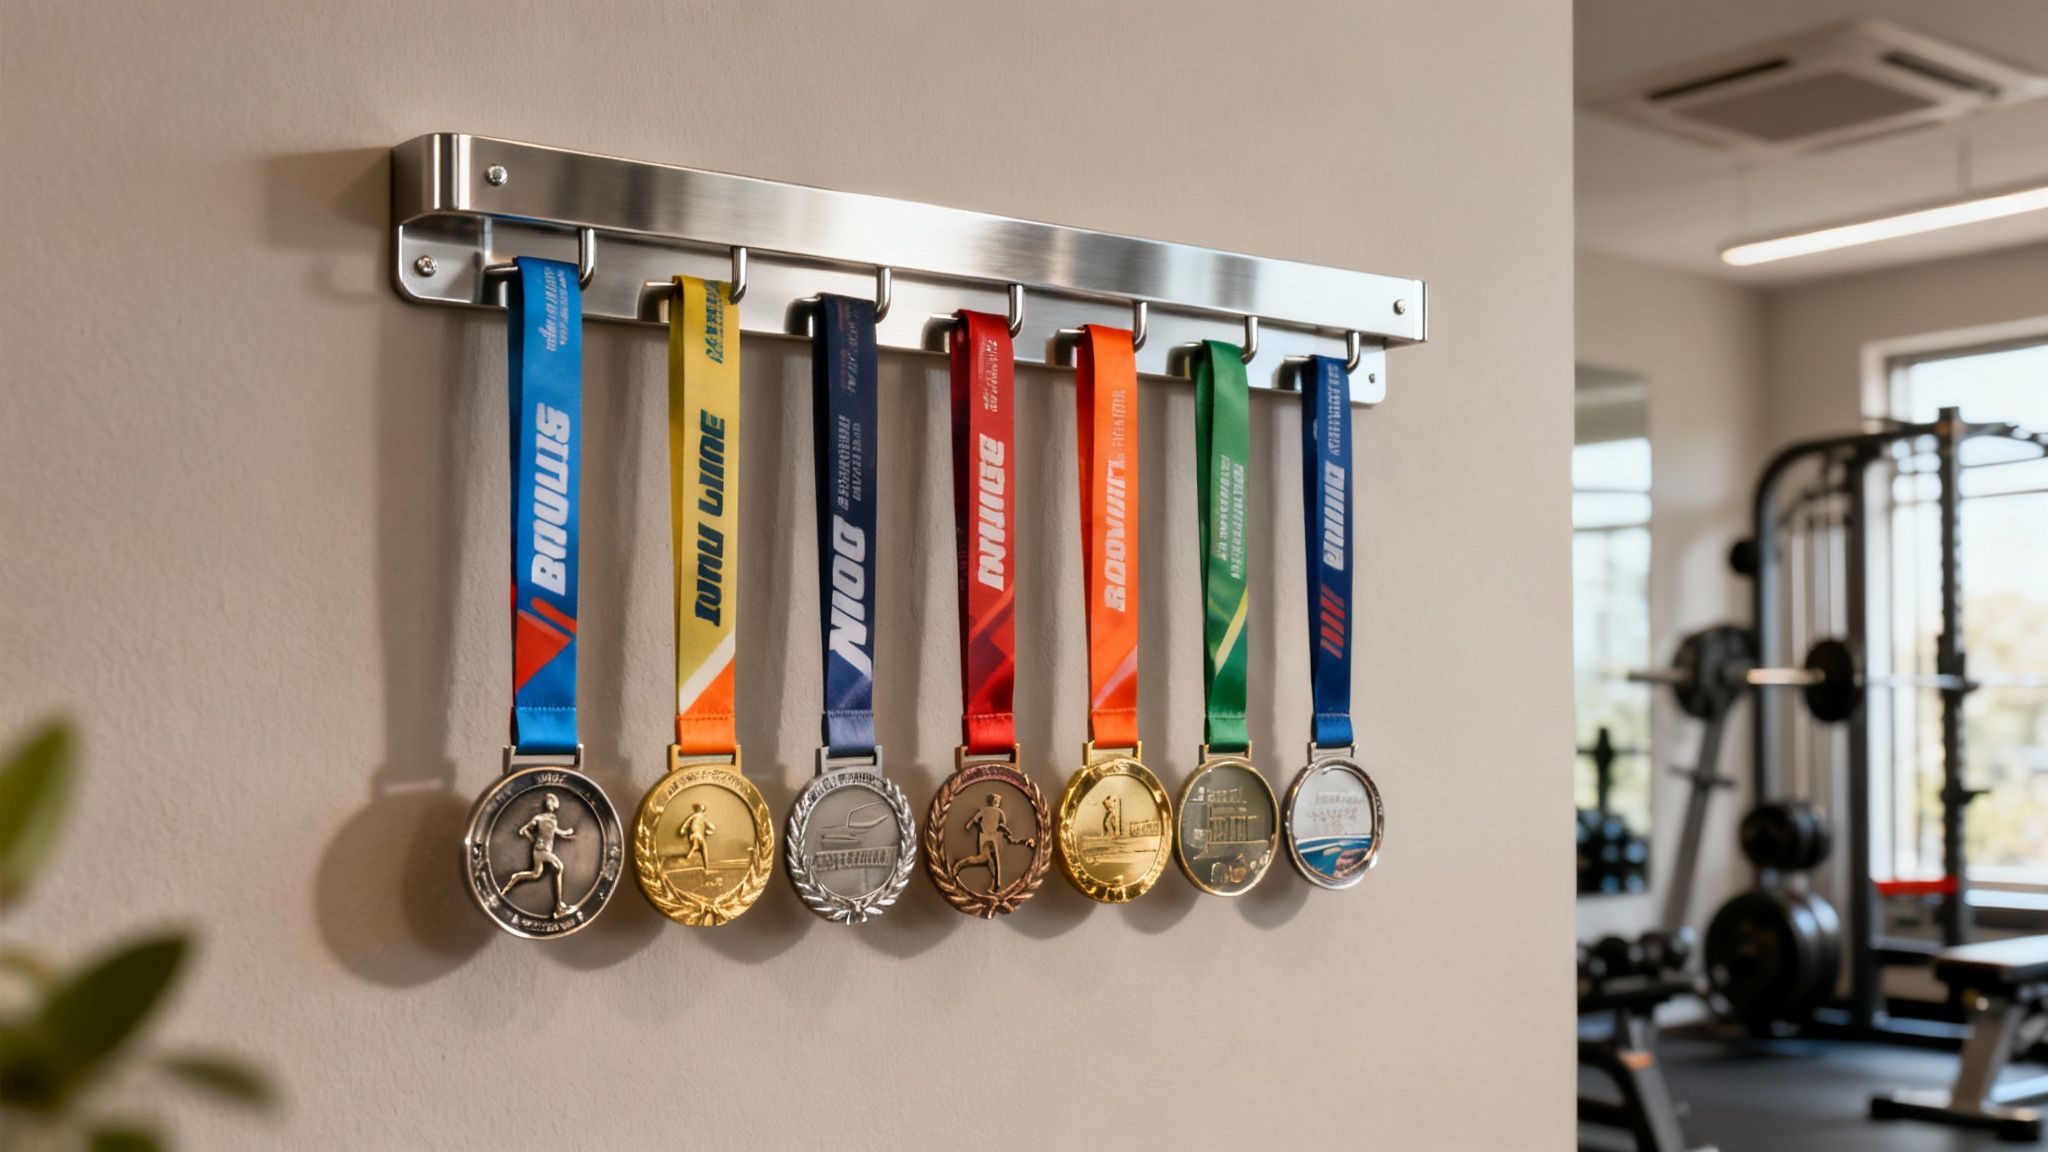
The great thing is, these hangers come in a ton of different styles, materials, and sizes, so finding one that fits your vibe and home decor is easy. The trick is to think about not just the medals you have now, but where your running journey is headed next.
Choosing the Right Material and Style
The material you choose really sets the tone for your display. Think about the room you’re putting it in and what will complement the space.
- Stainless Steel or Metal: If you’re after a sleek, modern look, you can’t go wrong here. They’re super durable and often come with cool laser-cut designs—maybe a city skyline from a favorite marathon or a motivational quote like "She Believed She Could, So She Did." A brushed metal finish is perfect for a home gym or a minimalist office.
- Wood: For something a bit warmer and more rustic, a wooden hanger is a fantastic choice. You can find everything from reclaimed barn wood for a cozy, farmhouse feel to polished oak for a classic, traditional look. Plus, wood is super easy to customize with paint or a new stain if you ever redecorate.
- Acrylic: If you want your medals to be the star of the show, acrylic is the way to go. Clear or colored acrylic hangers give you a contemporary, almost invisible display that makes your medals look like they're floating on the wall.
Once you’ve settled on a material, think about the design. Do you want a simple, straight bar for a clean, uniform line of medals? Or maybe a multi-tiered hanger to handle a massive and ever-growing collection? Some even come with a built-in shelf, which is perfect for race bibs, trophies, or other memorabilia.
Planning for Capacity and Growth
I've seen it happen time and again: a runner buys a hanger that’s just a little too small. It's so easy to underestimate how quickly your collection will expand, especially when you start signing up for more races.
Think of your medal hanger as an investment in your motivation. Choosing one with room to grow ensures you always have a place for your next big accomplishment, turning an empty hook into a goal waiting to be achieved.
Before you click "buy," count the medals you have now. Then, take a realistic guess at how many races you’ll run in the next couple of years. A good rule of thumb is to choose a hanger that can hold at least 50% more medals than you currently have. This keeps your display from looking cramped and saves you the hassle of buying a second hanger sooner than you expected.
For instance, if you have 15 medals, you should be looking for a hanger that holds at least 25-30. If you're a serious racer with a collection of 40+ medals, a multi-bar design is practically a necessity. It gives each medal enough breathing room to be seen clearly.
Proper spacing is key, especially for those unique, story-filled medals from events like the runDisney race weekends. You want the swashbuckling Pirates of the Caribbean 5K medal to stand out just as much as the dazzling Happily Ever After challenge award. Each one has a story, and each deserves its own space to tell it.
Tell a Race Story with a Shadow Box
While a medal hanger is perfect for showing off your entire running journey, a shadow box lets you zero in on a single, unforgettable race. Think of it as elevating that one special medal from a simple trophy to the centerpiece of its own mini-exhibit. This is the ideal way to honor that first marathon, a grueling ultra, or any race that truly tested your limits and deserves its own moment in the sun.
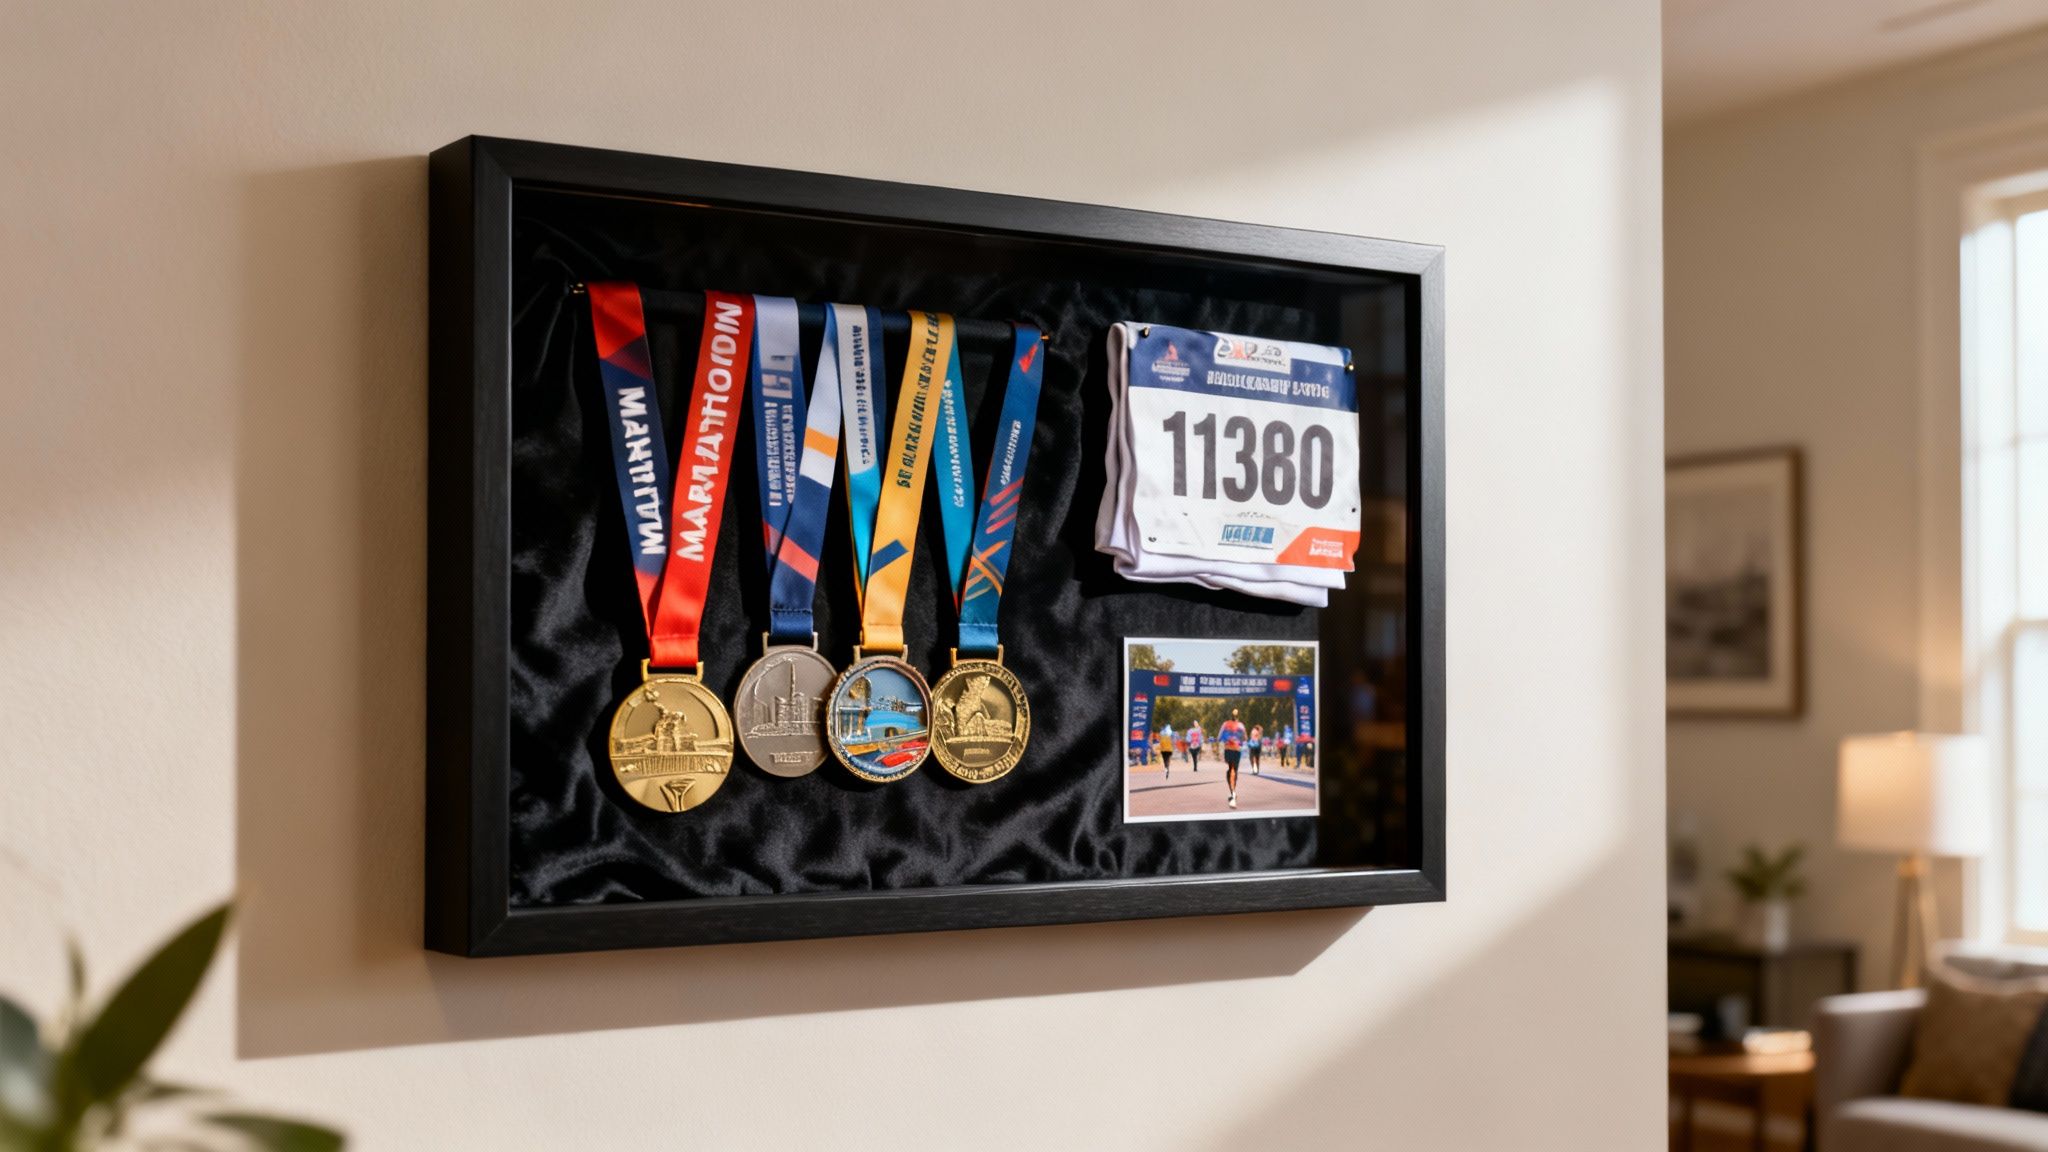
A good shadow box isn't just about the medal, though. It's about capturing the whole experience. You're bringing together different pieces from the event to create a visual story of your accomplishment, from the starting line jitters to the finish line triumph.
Find the Right Size and Depth
First things first: you need a box that actually fits your vision. The two most critical factors are size and depth. For a simple display—one medal, a race bib, and a photo—a standard 8x10 inch or 11x14 inch frame usually does the trick. But if you're commemorating a huge event like an Ironman with more memorabilia, you'll probably need to size up.
Depth is just as important. I always recommend looking for a box that's at least 1.5 to 2 inches deep. This gives your medal enough room to hang without smushing its ribbon against the glass, creating a much more professional, three-dimensional look. That extra space also lets you layer items, which adds a really nice dynamic feel to the whole composition.
Curate the Story of Your Race Day
Now for the fun part. Put on your curator hat and start gathering the artifacts that tell the complete story of your race day. The idea is to pick items that complement each other and paint a full picture.
Here are the essentials I always start with:
- The Medal: The star of the show, of course. Give it a prime spot.
- The Race Bib: You can fold it neatly or show the whole thing off—either way, it’s proof you were there.
- A Finish Line Photo: Nothing captures the raw emotion of that moment better.
- The Finisher's Certificate: The official acknowledgment of all your hard work.
- A Route Map: This is a fantastic way to visually represent the journey you conquered.
But don't stop there! Think about the little things. Did you save the confetti from the finish line? A ticket stub from the race expo? Each piece adds another layer to your story. One of the coolest ways I've seen to showcase the course is with a custom route poster. You can get one printed in a smaller size to fit perfectly inside the shadow box, serving as an artistic and detailed backdrop for your medal.
A shadow box is more than a frame; it’s a time capsule. Each item you add—the bib, the photo, the medal—is a chapter in the story of your race, preserving the memory of your hard-earned victory.
Assemble Your Display for Maximum Impact
Arranging everything is a bit of an art form, so don't rush it. My process is to lay everything out on a table first to play with the composition before I start pinning things down. Choose a background that makes your medal pop. A black or dark gray felt backing is fantastic for silver or gold medals, while something lighter might work better for more colorful ones.
When you're ready to secure everything, use quality materials.
- Straight Pins: These are your best friend for discreetly holding fabric items like the bib or the medal ribbon in place.
- Acid-Free Double-Sided Tape: Use this for photos and certificates. It’s strong but won't cause yellowing or damage over time.
- Small Hooks: For heavier medals, a tiny, self-adhesive hook stuck to the backing gives you that extra bit of security.
I always start by placing the biggest items, like the bib or a photo, to anchor the layout. Then, position the medal at a focal point—usually the center or just slightly off-center. From there, fill in the gaps with the smaller items. The goal is to create a balanced, engaging display that you'll be proud to look at for years to come.
Creative DIY Medal Display Projects You Can Build
If you really want a display with a personal touch, nothing beats building it yourself. A DIY medal holder isn't just a budget-friendly option; it's a chance to create something that perfectly fits your space, your style, and the stories behind your races. It turns your collection into a one-of-a-kind piece of art that no store-bought hanger can ever quite match.
And don't worry, you don’t need to be a master woodworker to tackle these projects. With just a few basic materials and a little creativity, you can build an impressive display that truly celebrates all that hard work. Let’s walk through a couple of popular ideas that are really easy to customize.
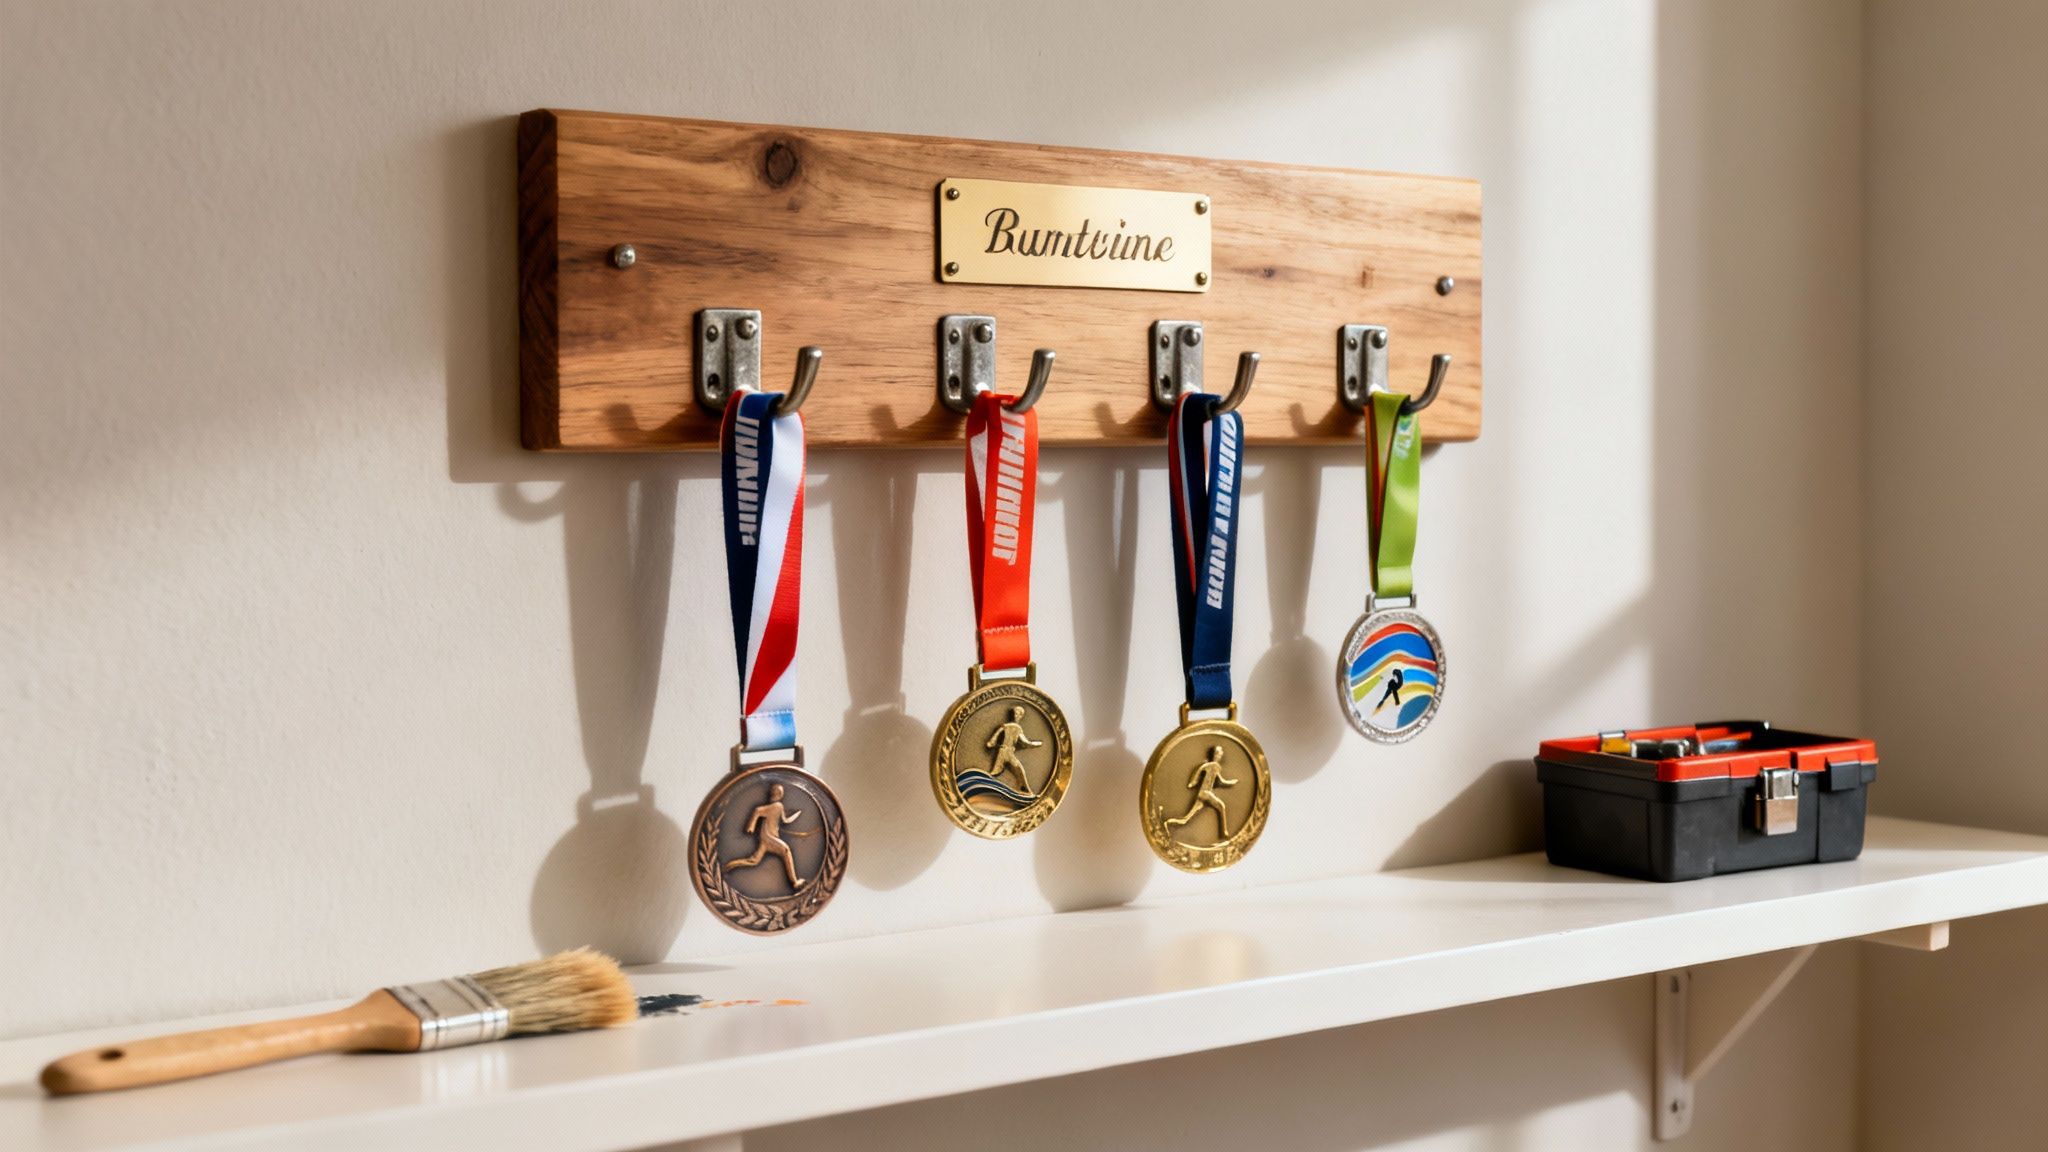
Rustic Wooden Plaque With Industrial Hooks
This project is a personal favorite because it blends warm, natural wood with a cool, industrial vibe. It’s surprisingly simple to make but looks incredibly clean and stylish in almost any room, whether it’s your home office or a dedicated pain cave. The real beauty of this design is how easily you can adapt it.
What You'll Need:
- A piece of wood: A standard 1x4 or 1x6 pine board, cut to whatever length you need, works perfectly. For extra character, reclaimed wood is a fantastic choice.
- Sandpaper: A medium grit (around 120) is all you need to smooth out the edges.
- Wood stain or paint: Pick a color that ties into your home's decor.
- Industrial hooks: Simple metal coat hooks or even hooks made from pipe fittings look great.
- Screws and wall anchors: Don't skip the anchors if you're mounting to drywall!
- A drill and measuring tape.
First things first, sand the wood until it's smooth, then apply your stain or paint. After it’s completely dry, it's time to place your hooks. Measure and mark where you want them, making sure they’re evenly spaced. From experience, I recommend leaving at least 2-3 inches between each hook so the medals don't look cramped. Drill pilot holes for the screws, attach the hooks, and you're almost done. To hang it, either attach sawtooth hangers to the back or drill right through the plaque into your wall anchors for a super secure fit.
Think of your DIY medal display as a blank canvas. Don't be afraid to add your own flair—stencil a favorite motivational quote, paint your PRs next to certain hooks, or even add a small shelf below for your race bibs.
Repurposed Curtain Rod Display
Looking for a minimalist and sleek way to show off your collection? A repurposed curtain rod is a brilliant solution. This method is especially great if you have a lot of medals and want to see them all at once. It creates this clean, floating effect that puts all the focus right where it should be: on the medals.
This project couldn't be more straightforward. All you need is a curtain rod set, complete with the rod, mounting brackets, and screws. Just pick a finish—like matte black, brushed nickel, or brass—that complements the other fixtures in the room.
The installation is literally as simple as hanging a curtain.
- Measure and mark where the brackets will go. Definitely use a level to make sure the rod will be perfectly straight.
- Drill your pilot holes and secure the brackets to the wall (again, use anchors for drywall).
- Slide your medals onto the rod. You can arrange them by color, race distance, or year—whatever you prefer.
- Pop the rod into the brackets and tighten everything down.
This approach offers an easy way to show how to display running medals without creating any clutter. It’s particularly effective for showcasing unique collections, like all the fun and whimsical medals from a runDisney race weekend, letting each one's distinct design really shine. The simplicity of the rod ensures your colorful, creative medals are the stars of the show.
Arranging Your Medals for Maximum Impact
Figuring out how to hang your running medals is only half the puzzle. The other half—where you put them—is what really makes the difference. A well-chosen spot can turn your collection from a simple display into a genuine source of daily motivation. It's about weaving your accomplishments into your home in a way that feels inspiring, not just cluttered.
Think about places you pass through every day. Your home office, a personal gym corner, or even a main hallway are fantastic options. You can turn an empty wall into a dedicated "brag wall," creating a focal point that tells the story of your running journey.
Creating a Balanced and Striking Layout
Once you've zeroed in on the perfect location, it's time to think like a curator. The goal is a clean, professional look that draws people in, rather than overwhelming them. I’ve seen a lot of displays where medals are crammed together, which unfortunately just makes the wall look busy. The secret is to give each one a little breathing room.
As a rule of thumb, leaving about 2-3 inches of space between each ribbon is a great starting point. This spacing lets the unique design of each medal pop while still creating a cohesive look for the whole collection. If you're going for a gallery wall vibe, try mixing things up—pair a sleek medal hanger with a framed route map or a shadow box containing a special bib.
When it comes to the actual arrangement, you have a lot of creative freedom. Here are a few ways I’ve seen people organize their collections to great effect:
- Chronological Order: This is my personal favorite because it shows your evolution as a runner, from that very first 5k to your latest marathon.
- By Race Distance: Grouping all your 10ks, half marathons, and full marathons together can create a really satisfying sense of order.
- By Color: For a purely visual punch, try arranging your medals by the color of their ribbons. It can create a stunning gradient effect.
- By Event: If you run certain races every year, grouping those medals together highlights your loyalty and tradition.
Your medal display isn't just decoration; it’s a physical timeline of your grit and dedication. Taking the time to arrange it thoughtfully ensures every finish line and hard-earned mile gets the spotlight it deserves.
It’s no surprise that the finisher's medal has become such a treasured keepsake. In fact, the global market for race medal design is projected to hit $2.35 billion by 2033. This boom shows just how much athletes value commemorating their achievements.
For an even more personal touch, think about pairing your medals with other race-day mementos. Hanging a personalized race poster right next to its corresponding medal tells a much richer story of your accomplishment. Our guide on personalized gifts for runners has plenty of other ideas for celebrating these milestones in a meaningful way.
Got Questions? We've Got Answers
Even after you've picked the perfect spot, a few practical questions always seem to pop up. Getting these small details right is often what separates a decent display from one that truly stands out and lasts. Let's dig into some of the most common hurdles runners face when setting up their wall of fame.
From making sure a loaded rack doesn't pull out of the wall to keeping your medals looking as shiny as the day you got them, a little bit of know-how goes a long way. Here are the answers to the questions we hear most often.
How Do I Make Sure a Heavy Medal Rack Stays on the Wall?
This is a huge concern, and for good reason! You've collected a lot of medals, and that weight adds up fast. The absolute best way to hang a heavy rack is to drill directly into a wall stud. A cheap stud finder is your best friend here; it takes all the guesswork out of locating those solid anchor points in your wall.
What if there's no stud exactly where you want to hang your display? No problem. Your next best bet is a set of heavy-duty drywall anchors. Don't just grab any old plastic anchor. Look for toggle bolts or the beefy, screw-in types rated to hold significantly more weight than your rack and medals combined. Pro tip: always use at least two anchor points for stability.
What's the Best Way to Clean and Maintain My Medals?
Over time, dust and even a bit of tarnish can take the shine off your hardware. The key to cleaning is to be gentle. A soft, dry microfiber cloth is perfect for wiping away dust without scratching the surface. Stay away from harsh chemical cleaners or anything abrasive—they can easily ruin the finish or plating on a medal.
For any stubborn smudges, you can slightly dampen the cloth with water, but make sure to dry the medal completely afterward to prevent any new tarnishing. For the ribbons, a little spot-cleaning with mild soap and water usually does the trick. Just let the ribbon air dry completely before you hang it back up.
Think of medal maintenance like post-race recovery. A little consistent care goes a long way in preserving them for years. A quick, gentle dusting every so often is all it really takes.
Can I Display My Medals Outside?
It’s an interesting thought, especially for a covered patio or a "man cave" in the garage, but we really don't recommend it. Exposing your medals to the elements, even indirectly, is a recipe for disaster.
Humidity and temperature swings will quickly cause the metal to tarnish, corrode, or even rust. Direct sunlight is just as bad, as it will bleach the vibrant colors right out of the ribbons in a surprisingly short amount of time. To keep your awards looking their best, always display them indoors where they’re safe and sound.
Ready to pair that hard-earned medal with a beautiful visual of the course you conquered? At RoutePrinter, we transform your greatest running achievements into minimalist works of art. You can design a custom poster for any marathon, half marathon, or local 5K that means the world to you.
Create your personalized race poster today at RoutePrinter.com!